Task Scheduling on Spring Boot Using @Scheduler
-
 Chinthaka Dinadasa
 - 03 Dec, 2022
In this article, we are going to discuss how we can build task scheduling requirements in spring boot using @scheduler annotation.
Assuming, you have a requirement to automate repetitive tasks which run on a specific time gap, or specific time in a month, week, or year, you can use a scheduler job to achieve that easily.
Requirements like pulling the latest updates from a news website or else scheduling daily financial report generations at a given time at night :). We can use scheduler based solution.
Setting Up Spring Boot Application With @Scheduler Using Spring Initializr
Tech stack that we are going to use,
- Spring Boot 2.7.6
- Java 11
- Gradle
- Lombok
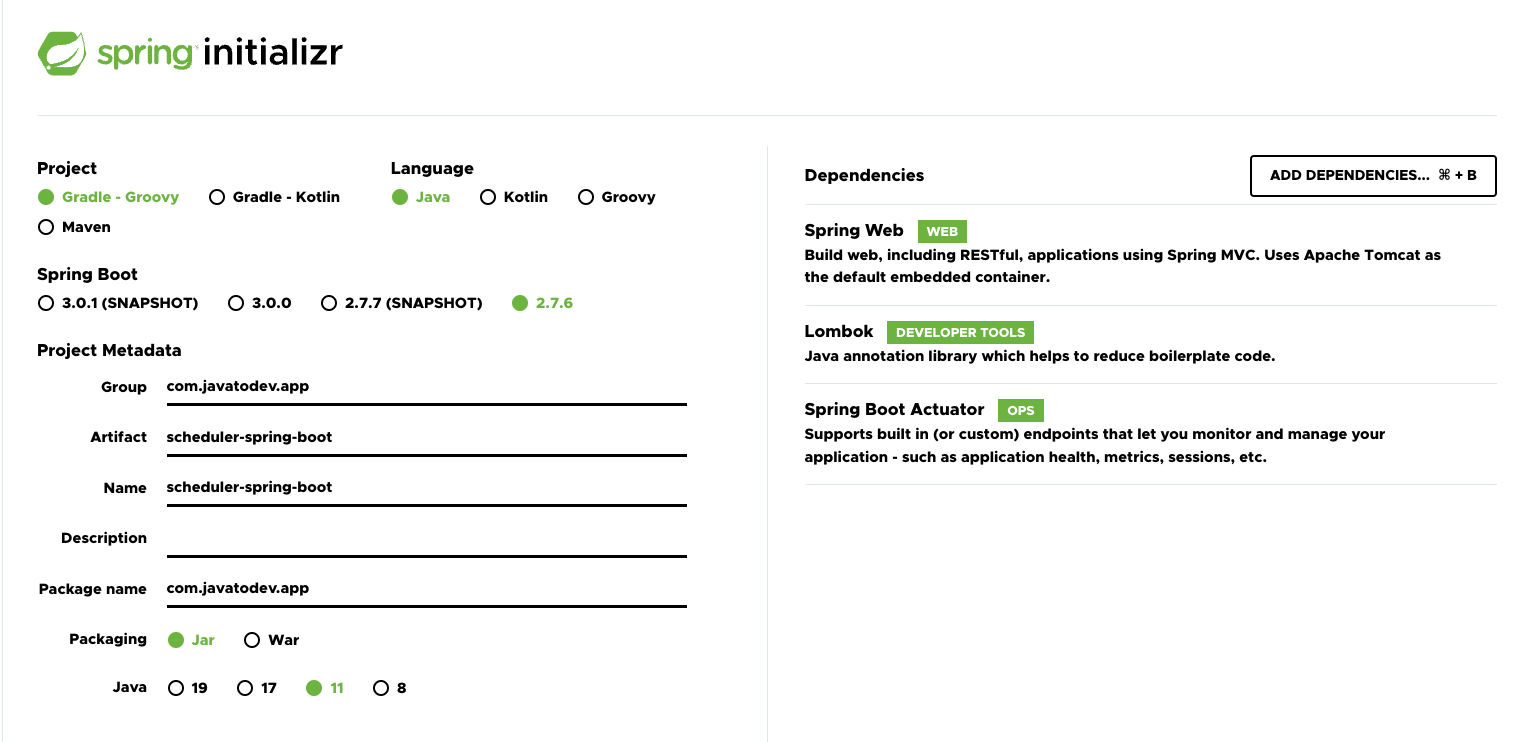
Creating spring boot application for scheduling using spring initializr
You can create applications using spring initializr or follow our tutorial on How to Create a Spring Boot Project.
- The scheduler is a component bundled with spring-context and it comes with spring-boot-starter dependency. Hence we don’t need to add any other dependency to enable scheduling in spring boot.
Enable Scheduling On Spring Boot Application
Scheduling is not active in the spring boot application by default. Hence we need to enable it first in order to use scheduler annotation inside an application.
We can achieve this by adding @EnableScheduling on the applications main class as below.
package com.javatodev.app;

import org.springframework.boot.SpringApplication;
import org.springframework.boot.autoconfigure.SpringBootApplication;
import org.springframework.scheduling.annotation.EnableScheduling;

@EnableScheduling
@SpringBootApplicationpublic
class SchedulerSpringBootApplication {
    public static void main(String[] args) {
        SpringApplication.run(SchedulerSpringBootApplication.class, args);
    }
}
Scheduling Tasks
Here we are going to scheduling multiple tasks with covering all the ways that we can schedule tasks one by one.
Additionally we are going to use service class called SchedulerService to setup all the scheduled tasks.
Also we are using @slf4j annotation which bundled with lombok library for logging purposes inside this application.
package com.javatodev.app.service;

import org.springframework.stereotype.Service;
import lombok.extern.slf4j.Slf4j;

@Slf4j
@Servicepublic
class SchedulerService {
}
Schedule Using FixedDelay
FixedDelay is the most basic implementation that we could use with @scheduler annotation. Here we have to give the number in milliseconds which will used as time interval between iterations.
If we need to run something in every 1 second gap we can use fixedDelay = 1000.
@Scheduled(fixedDelay = 1000)
public void schedulerOnEverySecond() {
log.info("------------Running every second------------");
}

Scheduled with fixed delay in spring boot
Schedule Using FixedDelay and TimeUnit
We can use timeUnit which allows us to set time unit for the given number on Fixed Delay as above. This timeunit allows us to set SECONDS, MINUTES, DAYS, HOURS.
@Scheduled(fixedDelay = 1, timeUnit = TimeUnit.MINUTES)
public void scheduledOnEveryTwentySeconds() {
log.info("------------Running every minute ------------");
}

Scheduled with fixed rate and time unit spring scheduler
Schedule With Initial Delay
Let’s assume we have a requirement to delay initial iteration to given time length and start the scheduling. In this case we can use initialDelay which comes with @scheduler.
@Scheduled(fixedDelay = 5000, initialDelay = 10000)
public void schedulerOnEveryFiveMinuteWithInitialDelayTenSeconds() {
log.info("------------Running every 5 seconds------------");
}

Scheduled with fixed rate and initial delay spring scheduler
Using Cron Expressions
Here is the basic explanation on cron expression.
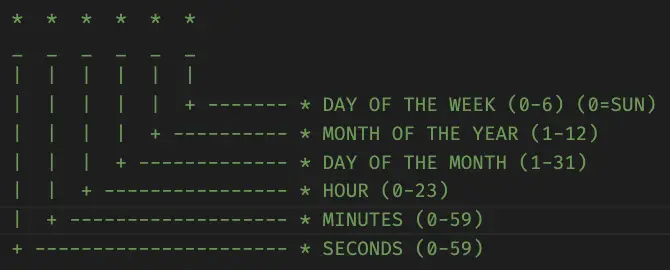
Cron expression explanation
We can use cron expression directly with @scheduler annotation.
@Scheduled(cron = "1 * * * * ?")
public void schedulerOnEveryMinute() {
log.info("------------Running every minute------------");
}
This job will run at 05:20 AM, on day 1 of the month
@Scheduled(cron = "20 5 1 * *")
public void customScheduleWithCron() {
log.info("------------Running every minute------------");
}
Loading Cron Expression From Application Properties
In actual developments we are not going to hard code things like cron expressions on code base. Instead of that we can use application properties to load cron expression where it will be easy to manage when we need to change or track.
Update application.properties file with following configuration.
app.scheduler.payment.process.cron=1 * * * * *
@Scheduled(cron = "${app.scheduler.payment.process.cron}")
public void scheduledOnEveryMinute() {
log.info("------------Running every minute------------");
}
Schedule With Inbuilt Macros In Spring
Spring supports scheduling with inbuilt macros which allows us to easily setup our scheduling tasks.
It has following macros,
@Scheduled(cron = "@hourly")
public void hourlyScheduledTask() {
log.info("------------Running every minute------------");
}
Conclusion
In this article we have discussed how we can use task scheduling on Spring Boot using @Scheduler on a practical scenarios.
The implementation of all these examples and code snippets can be found in our Github repository.
Happy coding.