Spring Boot JWT Authentication using Spring Security
-
 Chinthaka Dinadasa
 - 17 Nov, 2020

In this article, I’ll explain how we can implement a JWT (JSON Web Token) based authentication layer on Spring Boot CRUD API using Spring Security. Basically this JWT authentication layer will secure the API to avoid unauthorized API access.
Technologies Going to Use,
- Java 1.8
- Spring Boot: 2.3.4.RELEASE
- Spring Security
- JPA
- MySQL
- Lombok
- Gradle
- Intellij Idea for IDE
Main topics I’m going to discuss here,
- What is JWT ?
- How Does JWT Based Authentication work with Spring Boot?
- Adding Required Dependencies
- Developing API
- Defining API Endpoints
- Spring Security Related Implementation
- Testing API with JWT Authentication
- More Configurations inside JWT based Authentication Layer
- Conclusion
What is JWT?
JSON Web Token (JWT) is an open standard (RFC 7519) that defines a compact and self-contained way for securely transmitting information between parties as a JSON object. This information can be verified and trusted because it is digitally signed. JWTs can be signed using a secret (with the HMAC algorithm) or a public/private key pair using RSA or ECDSA. – Definition from JWT.io
Basically, JWT allows us to digitally signed a way of transmitting information between parties and when tokens are signed using public/private key pairs, the signature also certifies that only the party holding the private key is the one that signed it. So no one can breach the claims without the private key.
Follow the official documentation for more details about JWT from here.
How Does JWT Authentication work with Spring Boot?
Here is the sequence diagram for how JWT is in action inside Spring Boot application with Spring security.
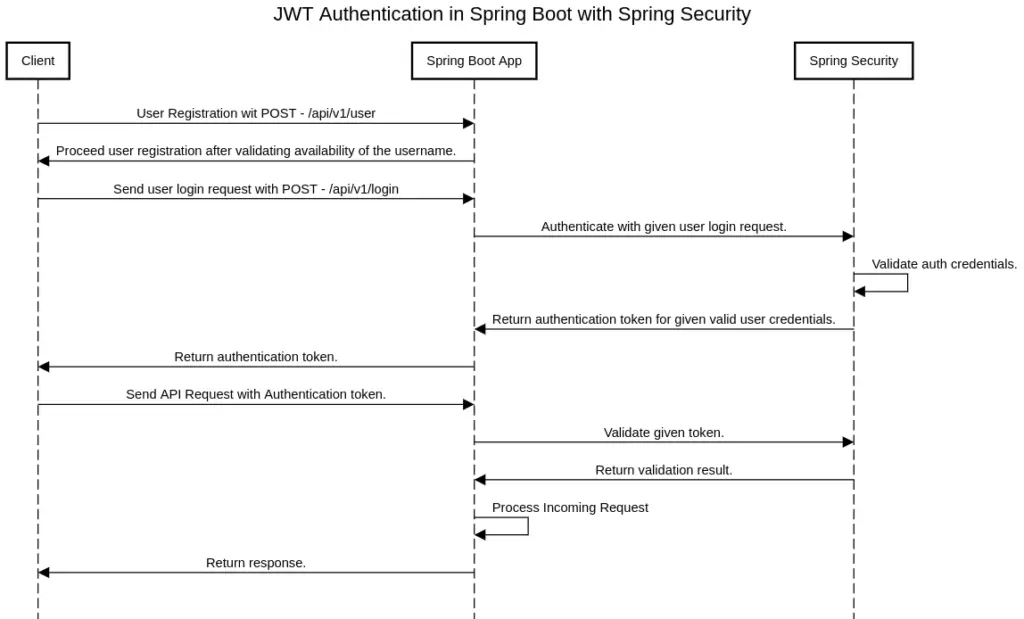
JWT Authentication in Spring Boot with Spring Security.
Adding Required Dependencies
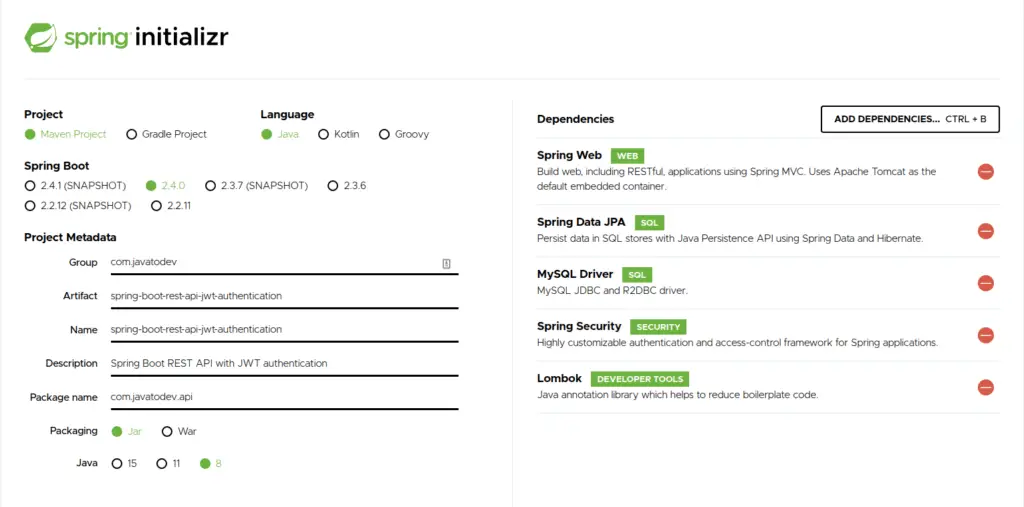
spring initializr to generate a spring boot project with all the dependencies I need for this tutorial. If you are really new to Spring Boot, Please follow our article on How to Create a Spring Boot Project.
Here I’ve selected following dependencies to create spring boot project using spring initilizr,
- Spring Web – contains common web-specific utilities for both Servlet and Portlet environments.
- Spring Data JPA – JPA with Spring Data.
- Spring Security – Spring security starter project to add spring security stuff into the spring boot project.
- Java JWT – Java implement ion of JSON web tokens. (JWT)
- MySQL Driver – Driver for access MySQL based database.
- Lombok – The coolest plugin to spicing up your java. Never write another getter or equals method again, with one annotation your class has a fully-featured builder, Automate your logging variables, and much more.
If you need to learn how we can use Lombok in spring boot follow our article Guide to use Lombok In Spring Boot.
Generating spring boot app with spring security and other libraries
If you are using Gradle based application following libraries should be present in your gradle.properties,
implementation 'org.springframework.boot:spring-boot-starter-data-jpa'
implementation 'org.springframework.boot:spring-boot-starter-security'
implementation 'org.springframework.boot:spring-boot-starter-web'
implementation 'com.auth0:java-jwt:3.11.0'
runtimeOnly 'mysql:mysql-connector-java'
compileOnly 'org.projectlombok:lombok'
annotationProcessor 'org.projectlombok:lombok'
Else if you are using maven based application, the following dependencies should be present in your application.
<dependencies>
    <dependency>
      <groupId>org.springframework.boot</groupId>
      <artifactId>spring-boot-starter-data-jpa</artifactId>
    </dependency>
    <dependency>
      <groupId>org.springframework.boot</groupId>
      <artifactId>spring-boot-starter-security</artifactId>
    </dependency>
    <dependency>
      <groupId>org.springframework.boot</groupId>
      <artifactId>spring-boot-starter-web</artifactId>
    </dependency>
    <dependency>
      <groupId>mysql</groupId>
      <artifactId>mysql-connector-java</artifactId>
      <scope>runtime</scope>
    </dependency>
    <dependency>
      <groupId>org.projectlombok</groupId>
      <artifactId>lombok</artifactId>
      <optional>true</optional>
    </dependency>
    <dependency>
      <groupId>com.auth0</groupId>
      <artifactId>java-jwt</artifactId>
      <version>3.11.0</version>
    </dependency>

  </dependencies>
Developing API
Here I’ll explain using a simple API that I’ve developed for Spring Boot REST API Using JPA, Hibernate, MySQL Tutorial article which I’ve written earlier.
Defining API Endpoints
This API is designed to demonstrate a simple API that covers CRUD Operations in a library scenario where books and author data are stored and members can burrow any book if it is available.
Additionally Here we need two additional APIs to accomplish our authentication layer integration.
Those are API endpoints to Register new API consume users and endpoint to Login and retrieve JWT for successful authentication.
So our main API endpoints will be as follow,
| Endpoint | HTTP Method | Description |
|---|---|---|
| /api/user | POST | Create user to consume API. |
| /login | POST | Request JWT token with Login request using auth credentials. |
| /api/library/book | GET | Read all books from database. |
| /api/library/book?isbn=1919 | GET | Read book by ISBN |
| /api/library/book/:id | GET | Read book by ID |
| /api/library/book | POST | Register New Book |
| /api/library/book/:id | DELETE | Remove a book |
| /api/library/book/lend | POST | Lend a book to a member |
| /api/library/member | POST | Register member |
| /api/library/member/:id | PATCH | Update a member |
API Endpoint List
and the base architecture will be like below,

Base architecture inside Spring Boot REST API with MySQL
Spring Security Implementation
API User API Development
Here first we need to add our additional API which allows us to create a user who is capable of consuming API. So for the moment, I’m going to implement a simple user entity to store username, and password along with id.
ApiUser.java JPA table entity.
package com.javatodev.api.model;

import javax.persistence.Entity;
import javax.persistence.GeneratedValue;
import javax.persistence.GenerationType;
import javax.persistence.Id;
import javax.persistence.Table;

import lombok.Getter;
import lombok.NoArgsConstructor;
import lombok.Setter;

@Getter
@Setter
@Entity
@Table(name = "user")
@NoArgsConstructor
public class ApiUser {

    @Id
    @GeneratedValue(strategy = GenerationType.IDENTITY)
    private Long id;
    private String username;
    private String password;

}
then user repository, Here I’ll add a custom method to find user by username, since it will be usable in spring security configuration while developing the user detail service.
package com.javatodev.api.repository;

import com.javatodev.api.model.ApiUser;

import org.springframework.data.jpa.repository.JpaRepository;

import java.util.Optional;

public interface UserRepository extends JpaRepository<ApiUser, Long> {
    Optional<ApiUser> findByUsername(String username);
}
Ok, now we can access our user table in the database using repository, Now we need to have the service implementation, But before that we should have our password encoder for this project. Here I’m going to use BCryptPasswordEncoder as the password encoder in this project.
First we need to introduce BCryptPasswordEncoder as a bean in to our application. So just add following configuration class into your project. Here we only have BCryptPasswordEncoder as a custom bean but, we can use these type of configuration class to introduce any number of custom beans inside spring application.
package com.javatodev.api.config;

import org.springframework.context.annotation.Bean;
import org.springframework.context.annotation.Configuration;
import org.springframework.security.crypto.bcrypt.BCryptPasswordEncoder;

@Configuration
public class WebConfiguration {

    @Bean
    public BCryptPasswordEncoder bCryptPasswordEncoder() {
        return new BCryptPasswordEncoder();
    }

}
Then we can develop the user service which has capabilities to create a new user and read user by username, additionally I’m encoding given password before its getting saved inside the database, To do that I’m using Bcrypt password encoder as a autowired component.
Additioanlly I’m using UserCreateRequest to bring data from REST controller to service.
package com.javatodev.api.model.request;

import lombok.Data;

@Data
public class UserCreateRequest {
    private String username;
    private String password;
}
package com.javatodev.api.service;

import com.javatodev.api.model.ApiUser;
import com.javatodev.api.model.request.UserCreateRequest;
import com.javatodev.api.repository.UserRepository;

import org.springframework.security.crypto.bcrypt.BCryptPasswordEncoder;
import org.springframework.stereotype.Service;

import java.util.Optional;

import javax.persistence.EntityNotFoundException;

import lombok.RequiredArgsConstructor;

@Service
@RequiredArgsConstructor
public class UserService {

    private final UserRepository userRepository;
    private final BCryptPasswordEncoder passwordEncoder;

    public ApiUser readUserByUsername (String username) {
        return userRepository.findByUsername(username).orElseThrow(EntityNotFoundException::new);
    }

    public void createUser(UserCreateRequest userCreateRequest) {
        ApiUser user = new ApiUser();
        Optional<ApiUser> byUsername = userRepository.findByUsername(userCreateRequest.getUsername());
        if (byUsername.isPresent()) {
            throw new RuntimeException("User already registered. Please use different username.");
        }
        user.setUsername(userCreateRequest.getUsername());
        user.setPassword(passwordEncoder.encode(userCreateRequest.getPassword()));
        userRepository.save(user);
    }
}
Last but not least, next we needs to have our API endpoint which is capable of creating new users using user service.
package com.javatodev.api.controller;

import com.javatodev.api.model.request.UserCreateRequest;
import com.javatodev.api.service.UserService;

import org.springframework.http.ResponseEntity;
import org.springframework.web.bind.annotation.PostMapping;
import org.springframework.web.bind.annotation.RequestBody;
import org.springframework.web.bind.annotation.RequestMapping;
import org.springframework.web.bind.annotation.RestController;

import lombok.RequiredArgsConstructor;

@RestController
@RequestMapping(value = "/api/user")
@RequiredArgsConstructor
public class UserController {
    private final UserService userService;

    @PostMapping
    public ResponseEntity createUser (@RequestBody UserCreateRequest userCreateRequest) {
        userService.createUser(userCreateRequest);
        return ResponseEntity.ok().build();
    }

}
Now we have finalized all the API endpoints which we needs to have in our application including the user specific controller and database access layers.
Authentication Filter with UsernamePasswordAuthenticationFilter
Now we have to do a base configuration part which is needs to configure with spring security. Here We needs to add a two different filters which have different uses. Here I’m going to explain how we can add the Authentication filter and what is the reason we should have an authentication filter inside JWT enabled spring boot project.
What is the use of Authentication Filter ?
An authentication filter is the main point from which every authentication request is coming.
So let’s think we are requesting an authentication token with correct user credentials, Then an incoming request will first come into the Authentication filters attempt authentication method, After that we needs to capture given credentials from incoming request and give authentication manager to handle validations.
// Reading incoming authentication properties.
ApiUser creds = new ObjectMapper()
                .readValue(request.getInputStream(), ApiUser.class);

//try to authenticate with incoming request.
            return authenticationManager.authenticate(
                new UsernamePasswordAuthenticationToken(
                    creds.getUsername(),
                    creds.getPassword(),
                    new ArrayList<>())
            );
Then if our authenticatication is successfull, We needs to configure way of returning newly generated authentication token to the client.
to do that we should implement a successful authentication method and inside the method, we should generate a new JWT token and return it to the client-side.
@Override protected void successfulAuthentication(HttpServletRequest request, HttpServletResponse response, FilterChain chain, Authentication auth) throws IOException, ServletException {
        String token = JWT.create()
            .withSubject(((User) auth.getPrincipal()).getUsername())
            .withExpiresAt(new Date(System.currentTimeMillis() + AuthenticationConfigConstants.EXPIRATION_TIME))
            .sign(Algorithm.HMAC512(AuthenticationConfigConstants.SECRET.getBytes()));
        response.addHeader(AuthenticationConfigConstants.HEADER_STRING, AuthenticationConfigConstants.TOKEN_PREFIX + token);
    }
We are setting following values into the JWT token Generation,
-
Subject – Here I’m setting logged users username as a subject.
-
Expiry Time – We can set the validity of the JWT token with this flag. Here we should set the date where the generated token will get expired.
-
Sign – We can set a signing algorithm with a secret using this method.
Then the generated authentication token will be shared with the response header with a token prefix.
There is a class with constants which we need to refer in security specific classes and it’s like below,
package com.javatodev.api.config;

public class AuthenticationConfigConstants {
    public static final String SECRET = "Java_to_Dev_Secret";
    public static final long EXPIRATION_TIME = 864000000; // 10 days
    public static final String TOKEN_PREFIX = "Bearer ";
    public static final String HEADER_STRING = "Authorization";
    public static final String SIGN_UP_URL = "/api/user";
}
Here we are writing a new class with extending org.springframework.security.web.authentication.UsernamePasswordAuthenticationFilter.
package com.javatodev.api.filter;

import com.auth0.jwt.JWT;
import com.auth0.jwt.algorithms.Algorithm;
import com.fasterxml.jackson.databind.ObjectMapper;
import com.javatodev.api.config.AuthenticationConfigConstants;
import com.javatodev.api.model.ApiUser;

import org.springframework.security.authentication.AuthenticationManager;
import org.springframework.security.authentication.UsernamePasswordAuthenticationToken;
import org.springframework.security.core.Authentication;
import org.springframework.security.core.AuthenticationException;
import org.springframework.security.core.userdetails.User;
import org.springframework.security.web.authentication.UsernamePasswordAuthenticationFilter;

import java.io.IOException;
import java.util.ArrayList;
import java.util.Date;

import javax.servlet.FilterChain;
import javax.servlet.ServletException;
import javax.servlet.http.HttpServletRequest;
import javax.servlet.http.HttpServletResponse;

import lombok.RequiredArgsConstructor;

@RequiredArgsConstructor
public class JWTAuthenticationFilter extends UsernamePasswordAuthenticationFilter {

    private final AuthenticationManager authenticationManager;

    @Override public Authentication attemptAuthentication(HttpServletRequest request, HttpServletResponse response) throws AuthenticationException {
        try {
            ApiUser creds = new ObjectMapper()
                .readValue(request.getInputStream(), ApiUser.class);

            return authenticationManager.authenticate(
                new UsernamePasswordAuthenticationToken(
                    creds.getUsername(),
                    creds.getPassword(),
                    new ArrayList<>())
            );
        } catch (IOException e) {
            throw new RuntimeException(e);
        }
    }

    @Override protected void successfulAuthentication(HttpServletRequest request, HttpServletResponse response, FilterChain chain, Authentication auth) throws IOException, ServletException {
        String token = JWT.create()
            .withSubject(((User) auth.getPrincipal()).getUsername())
            .withExpiresAt(new Date(System.currentTimeMillis() + AuthenticationConfigConstants.EXPIRATION_TIME))
            .sign(Algorithm.HMAC512(AuthenticationConfigConstants.SECRET.getBytes()));
        response.addHeader(AuthenticationConfigConstants.HEADER_STRING, AuthenticationConfigConstants.TOKEN_PREFIX + token);
    }
}
JWT Authorization Filter with BasicAuthenticationFilter
Ok, now we have configured the way our application will work while getting a request to do the authentication. Then we need to handle how authorization will be handled inside our application. In that case we could use JWTAuthorizationFilter with extending org.springframework.security.web.authentication.www.BasicAuthenticationFilter.
What is the use of JWT authorization Filter ?
In a JWT authorization filter, It does the filtration to identify and validate the given token of any incoming request. Here we are using org.springframework.security.web.authentication.www.BasicAuthenticationFilter class and from that we override the doFilterInternal method. this method is capable of capturing incoming requests and allow or block the request after validating it,
Here this is our implementation for doFilterInternal method, Here we are capturing incoming request and check is there any token present,
@Override protected void doFilterInternal(HttpServletRequest request, HttpServletResponse response, FilterChain chain) throws IOException, ServletException {
        String header = request.getHeader(AuthenticationConfigConstants.HEADER_STRING);

        if (header == null || !header.startsWith(AuthenticationConfigConstants.TOKEN_PREFIX)) {
            chain.doFilter(request, response);
            return;
        }

        UsernamePasswordAuthenticationToken authentication = getAuthentication(request);

        SecurityContextHolder.getContext().setAuthentication(authentication);
        chain.doFilter(request, response);
    }
Then we should validate the token present with our request,
private UsernamePasswordAuthenticationToken getAuthentication(HttpServletRequest request) {
        String token = request.getHeader(AuthenticationConfigConstants.HEADER_STRING);
        if (token != null) {
            // parse the token.
            String user = JWT.require(Algorithm.HMAC512(AuthenticationConfigConstants.SECRET.getBytes()))
                .build()
                .verify(token.replace(AuthenticationConfigConstants.TOKEN_PREFIX, ""))
                .getSubject();

            if (user != null) {
                return new UsernamePasswordAuthenticationToken(user, null, new ArrayList<>());
            }
            return null;
        }
        return null;
    }
Here we are using the same SECRET we used in JWT generation to validate incoming authentication token. Then verify it. Then If verification is successful It will return a UsernamePasswordAuthenticationToken, and authorization will be suiccesfuly completed.
package com.javatodev.api.filter;

import com.auth0.jwt.JWT;
import com.auth0.jwt.algorithms.Algorithm;
import com.javatodev.api.config.AuthenticationConfigConstants;

import org.springframework.security.authentication.AuthenticationManager;
import org.springframework.security.authentication.UsernamePasswordAuthenticationToken;
import org.springframework.security.core.context.SecurityContextHolder;
import org.springframework.security.web.authentication.www.BasicAuthenticationFilter;

import java.io.IOException;
import java.util.ArrayList;

import javax.servlet.FilterChain;
import javax.servlet.ServletException;
import javax.servlet.http.HttpServletRequest;
import javax.servlet.http.HttpServletResponse;

public class JWTAuthorizationFilter extends BasicAuthenticationFilter {

    public JWTAuthorizationFilter(AuthenticationManager authenticationManager) {
        super(authenticationManager);
    }

    @Override protected void doFilterInternal(HttpServletRequest request, HttpServletResponse response, FilterChain chain) throws IOException, ServletException {
        String header = request.getHeader(AuthenticationConfigConstants.HEADER_STRING);

        if (header == null || !header.startsWith(AuthenticationConfigConstants.TOKEN_PREFIX)) {
            chain.doFilter(request, response);
            return;
        }

        UsernamePasswordAuthenticationToken authentication = getAuthentication(request);

        SecurityContextHolder.getContext().setAuthentication(authentication);
        chain.doFilter(request, response);
    }


    private UsernamePasswordAuthenticationToken getAuthentication(HttpServletRequest request) {
        String token = request.getHeader(AuthenticationConfigConstants.HEADER_STRING);
        if (token != null) {
            // parse the token.
            String user = JWT.require(Algorithm.HMAC512(AuthenticationConfigConstants.SECRET.getBytes()))
                .build()
                .verify(token.replace(AuthenticationConfigConstants.TOKEN_PREFIX, ""))
                .getSubject();

            if (user != null) {
                return new UsernamePasswordAuthenticationToken(user, null, new ArrayList<>());
            }
            return null;
        }
        return null;
    }

}
Now we have all the filters that we needs to have inside our JWT enabled spring boot project.
Then we have only one thing is pending in order to authenticate and authorize our API with JWT. That’s our Main security configuration class. But before that we needs to have our UserDetailService.
Authentication User Detail Service to Read User From Database
UserDetailService is the class which coming from spring security which we could use to introduce implementation on how our application should read a user.
In here I’m implementing UserDetailsService which and override loadByUsername method. Then we can add our custom implementation on how Spring security should read the user. So here I’m using the UserService which I’ve developed earlier in this tutorial to read user by username.
Then we should set our user’s username and password with role list to the org.springframework.security.core.userdetails.User. Here I’m setting an empty list of roles and I’ll show how we can have role-based authorization at the end of this tutorial.
package com.javatodev.api.service;

import com.javatodev.api.model.ApiUser;

import org.springframework.security.core.userdetails.UserDetails;
import org.springframework.security.core.userdetails.UserDetailsService;
import org.springframework.security.core.userdetails.UsernameNotFoundException;
import org.springframework.stereotype.Service;

import java.util.Collections;

import lombok.RequiredArgsConstructor;

@Service
@RequiredArgsConstructor
public class AuthenticationUserDetailService implements UserDetailsService {

    private final UserService userService;

    @Override public UserDetails loadUserByUsername(String username) throws UsernameNotFoundException {
        ApiUser apiUser = userService.readUserByUsername(username);
        if (apiUser == null) {
            throw new UsernameNotFoundException(username);
        }
        return new org.springframework.security.core.userdetails.User(apiUser.getUsername(), apiUser.getPassword(), Collections.emptyList());
    }
}
Security Configuration With WebSecurityConfigurerAdapter
Now we need to introduce all the components we developed for our security configuration. To do that we can have a configuration class with extending org.springframework.security.config.annotation.web.configuration.WebSecurityConfigurerAdapter.
package com.javatodev.api.config;

import com.javatodev.api.filter.JWTAuthenticationFilter;
import com.javatodev.api.filter.JWTAuthorizationFilter;
import com.javatodev.api.service.AuthenticationUserDetailService;

import org.springframework.http.HttpMethod;
import org.springframework.security.config.annotation.authentication.builders.AuthenticationManagerBuilder;
import org.springframework.security.config.annotation.web.builders.HttpSecurity;
import org.springframework.security.config.annotation.web.configuration.EnableWebSecurity;
import org.springframework.security.config.annotation.web.configuration.WebSecurityConfigurerAdapter;
import org.springframework.security.config.http.SessionCreationPolicy;
import org.springframework.security.crypto.bcrypt.BCryptPasswordEncoder;

import lombok.RequiredArgsConstructor;

@EnableWebSecurity
@RequiredArgsConstructor
public class SecurityConfiguration extends WebSecurityConfigurerAdapter {

    private final BCryptPasswordEncoder bCryptPasswordEncoder;
    private final AuthenticationUserDetailService authenticationUserDetailService;

    @Override protected void configure(HttpSecurity http) throws Exception {
        http.cors().and().csrf().disable().authorizeRequests()
            .antMatchers(HttpMethod.POST, AuthenticationConfigConstants.SIGN_UP_URL).permitAll()
            .anyRequest().authenticated()
            .and()
            .addFilter(new JWTAuthenticationFilter(authenticationManager()))
            .addFilter(new JWTAuthorizationFilter(authenticationManager()))
            // this disables session creation on Spring Security
            .sessionManagement().sessionCreationPolicy(SessionCreationPolicy.STATELESS);
    }

    @Override
    public void configure(AuthenticationManagerBuilder auth) throws Exception {
        auth.userDetailsService(authenticationUserDetailService).passwordEncoder(bCryptPasswordEncoder);
    }
}
Whats happening inside this security configuration class ?
- http.cors().and().csrf().disable() – This will disable CSRF protection and Cross origin from our API.
- .antMatchers(HttpMethod.POST, AuthenticationConfigConstants.SIGN_UP_URL).permitAll() – With this I’m allowing to access our user register API endpoint without authentication.
- .anyRequest().authenticated() – This will authenticate every and each request coming to our API.
- .addFilter(new JWTAuthenticationFilter(authenticationManager())) – Introducing authentication filter.
- .addFilter(new JWTAuthorizationFilter(authenticationManager()))– Introducing authorization filter.
- .sessionManagement().sessionCreationPolicy(SessionCreationPolicy.STATELESS) – Setting session creation policy to STATELESS.
- auth.userDetailsService(authenticationUserDetailService).passwordEncoder(bCryptPasswordEncoder); – Here we are setting our user details service implementation with password encoder.
All done. Now our API is capable of authentication and authorization with JWT.
Testing API with JWT Authentication
First let’s start with creating a API user with password who is allowed to generate JWT token to access other API endpoints.
curl --location --request POST 'http://localhost:8080/api/user' \
--header 'Content-Type: application/json' \
--data-raw '{
    "username":"jtd_api_user",
    "password": "javatode@123"
}'
Now we have a user with the correct credentials in our database. Then we can generate an authentication token using those credentials as below.
curl -i --location --request POST 'http://localhost:8080/login' --header 'Content-Type: application/json' --data-raw '{
    "username": "jtd_api_user",
    "password": "javatode@123"
}'
Then you can find the generated authentication token with the Bearer prefix inside a response header.

Generated authentication token using JWT
Sending API request with authentication token we got from JWT authentication. Here we just needs to add authentication token with the token prefix which is Bearer here as a Authorization header and send the request.
curl --location --request POST 'http://localhost:8080/api/library/author' \
--header 'Content-Type: application/json' \
--header 'Authorization: Bearer eyJ0eXAiOiJKV1QiLCJhbGciOiJIUzUxMiJ9.eyJzdWIiOiJqdGRfYXBpX3VzZXIiLCJleHAiOjE2MDY1MDE4MjJ9.2TBlaqqmXcXUEIU97c1VuRwmJJphZTIAcOd9u6YLYSw8cBFTdJkyYGcwKOrre9TaG-0_E1kY_vqJasPCDiQTIg' \
--data-raw '{
	"firstName": "John",
	"lastName": "Doe"
}'
More Configurations inside JWT based Authentication Layer
For the moment we have succesfully configured JWT based authentication layer to secure spring boot REST API. From here I’ll explain how we can develop this solution to support more capabilities.
Send JWT Authentication Token in Response Body After Successful Login
In this example, we have configured our application to send a JWT authentication token as a response header. But we can send it in the response body as well.
You just needs to change JWTAuthenticationFilter successfulAuthentication method as below to send JWT token in response body.
response.setContentType("application/json");
        response.setCharacterEncoding("UTF-8");
        response.getWriter().write(
            "{\"" + AuthenticationConfigConstants.HEADER_STRING + "\":\"" + AuthenticationConfigConstants.TOKEN_PREFIX + token + "\"}"
        );
Basically I’m writing a custom JSON response with a response writer in order to return generated token as a JSON to the successful authentication.
Full code,
@Override
protected void successfulAuthentication(HttpServletRequest request, HttpServletResponse response, FilterChain chain, Authentication auth) throws IOException, ServletException {
        String token = JWT.create()
            .withSubject(((User) auth.getPrincipal()).getUsername())
            .withExpiresAt(new Date(System.currentTimeMillis() + AuthenticationConfigConstants.EXPIRATION_TIME))
            .sign(Algorithm.HMAC512(AuthenticationConfigConstants.SECRET.getBytes()));

        response.setContentType("application/json");
        response.setCharacterEncoding("UTF-8");
        response.getWriter().write(
            "{\"" + AuthenticationConfigConstants.HEADER_STRING + "\":\"" + AuthenticationConfigConstants.TOKEN_PREFIX + token + "\"}"
        );
    }
Role-Based Authentication with JWT
For the moment we have developed this JWT integration without defining ROLE for any user, But we can add role based authentication mechanism with this setup as well.
First we need to change our AuthUser to have role,
public class ApiUser {

    @Id
    @GeneratedValue(strategy = GenerationType.IDENTITY)
    private Long id;
    private String username;
    private String password;
    private String role;

}
Then change our UserCreateRequest to bring a role from the API and add changes to user service to set a Role while creating a user.
@Data
public class UserCreateRequest {
    private String username;
    private String password;
    private String role;
}
public void createUser(UserCreateRequest userCreateRequest) {
        ApiUser apiUser = new ApiUser();
        Optional<ApiUser> byUsername = userRepository.findByUsername(userCreateRequest.getUsername());
        if (byUsername.isPresent()) {
            throw new RuntimeException("User already registered. Please use different username.");
        }
        apiUser.setUsername(userCreateRequest.getUsername());
        apiUser.setPassword(passwordEncoder.encode(userCreateRequest.getPassword()));
        apiUser.setRole(userCreateRequest.getRole());
        userRepository.save(apiUser);
    }
All done now we can store a user with single role.
Now you can create a user with using following request,
curl --location --request POST 'http://localhost:8080/api/user' \
--header 'Content-Type: application/json' \
--data-raw '{
    "username":"jtd_api_user_4",
    "password": "javatode@123",
    "role": "ADMIN"
}'
Now we have capability of creating users with assigning role.
Let’s change our Authentication layer to support these roles.
First we should set roles from DB to org.springframework.security.core.userdetails.User, Here Spring security supports for List of Roles, But for this tutorial, I’ll use a single role for each user.
To do that we should change our AuthenticationUserDetailService methods as below,
@Override public UserDetails loadUserByUsername(String username) throws UsernameNotFoundException {
        ApiUser apiUser = userService.readUserByUsername(username);
        if (apiUser == null) {
            throw new UsernameNotFoundException(username);
        }
        return new org.springframework.security.core.userdetails.User(apiUser.getUsername(),
            apiUser.getPassword(), getAuthorities(apiUser.getRole()));
    }

    private Collection<? extends GrantedAuthority> getAuthorities(String role) {
        return Arrays.asList(new SimpleGrantedAuthority(role));
    }
Here we are setting the role coming from the DB to Spring security, So basically now spring security could identify roles assigned to this user while handling the login.
Then we should change our JWTAuthenticationFilter to send role of logged user as a JWT claim,
we can do that with below change on where we generate JWT token,
String token = JWT.create()
            .withSubject(((User) auth.getPrincipal()).getUsername())
            .withClaim("role", auth.getAuthorities().iterator().next().getAuthority())
            .withExpiresAt(new Date(System.currentTimeMillis() + AuthenticationConfigConstants.EXPIRATION_TIME))
            .sign(Algorithm.HMAC512(AuthenticationConfigConstants.SECRET.getBytes()));
Now our API could return a JWT token with username as subject and role as a claim, So what is pending is to capture these values on API request and handle the validation.
In that case we just needs to change our JWTAuthorizationFilter to capture the role from claims of incoming requests JWT token, and set those roles into Spring security context.
We can capture role as below from DecodedJWT,
DecodedJWT verify = JWT.require(Algorithm.HMAC512(AuthenticationConfigConstants.SECRET.getBytes()))
                .build()
                .verify(token.replace(AuthenticationConfigConstants.TOKEN_PREFIX, ""));
String username = verify.getSubject();
String role = verify.getClaim("role").asString();
After that, we should set it to UsernamePasswordAuthenticationToken as below,
UsernamePasswordAuthenticationToken(username, null, getAuthorities(role));

private Collection<? extends GrantedAuthority> getAuthorities(String role) {
        return Arrays.asList(new SimpleGrantedAuthority(role));
    }
Full code snippet for JWT Authorization Filter,
private UsernamePasswordAuthenticationToken getAuthentication(HttpServletRequest request) {
        String token = request.getHeader(AuthenticationConfigConstants.HEADER_STRING);
        if (token != null) {
            // parse the token.
            DecodedJWT verify = JWT.require(Algorithm.HMAC512(AuthenticationConfigConstants.SECRET.getBytes()))
                .build()
                .verify(token.replace(AuthenticationConfigConstants.TOKEN_PREFIX, ""));

            String username = verify.getSubject();
            String role = verify.getClaim("role").asString();

            if (username != null) {
                return new UsernamePasswordAuthenticationToken(username, null, getAuthorities(role));
            }
            return null;
        }
        return null;
    }

    private Collection<? extends GrantedAuthority> getAuthorities(String role) {
        return Arrays.asList(new SimpleGrantedAuthority(role));
    }
Ok now our API is has capability on returning a Role based authentication params with JWT tokens and capture those values from incoming requests.
Now we have only to do is setup the way and what are the places those roles could access inside our REST API.
To do that we should add few changes on SecurityConfiguration.
.antMatchers("/api/library/book/**").hasAnyAuthority("USER", "ADMIN")
            .antMatchers("/api/library/author/**").hasAnyAuthority("ADMIN")
            .antMatchers("/api/library/member/**").hasAnyAuthority("ADMIN")
What’s happening here is we are allowing,
users with USER and ADMIN roles to access every endpoint under /api/library/book/ URL.
and ADMIN role users are the only users who are allowed to access /api/library/member and /api/library/author specific API endpoints.
Full code snippet,
@Override protected void configure(HttpSecurity http) throws Exception {
        http.cors().and().csrf().disable().authorizeRequests()
            .antMatchers(HttpMethod.POST, AuthenticationConfigConstants.SIGN_UP_URL).permitAll()
            .antMatchers("/api/library/book/**").hasAnyAuthority("USER", "ADMIN")
            .antMatchers("/api/library/author/**").hasAnyAuthority("ADMIN")
            .antMatchers("/api/library/member/**").hasAnyAuthority("ADMIN")
            .anyRequest().authenticated()
            .and()
            .addFilter(new JWTAuthenticationFilter(authenticationManager()))
            .addFilter(new JWTAuthorizationFilter(authenticationManager()))
            // this disables session creation on Spring Security
            .sessionManagement().sessionCreationPolicy(SessionCreationPolicy.STATELESS);
    }
All done, now our API could handle Role based authentication with using JWT.
Conclusion
All done, Now I hope you have a good understanding of how to implement JWT based authentication with Spring Boot REST API development. Comment on your ideas or issues you are facing while developing your Spring boot API.
You can find source codes for this tutorial from our Github.