Microservices - Setup API Gateway Using Spring Cloud Gateway
-
 Chinthaka Dinadasa
 - 14 May, 2021
Hi guys, Here is our newest addition to the Building Microservices With Spring Boot – Free Course With Practical Project. In this article, I’m going to explain how we can set up an API gateway into our microservices project using the Spring Cloud Gateway library. Before that let’s know a few things about API gateway.
What is the use of an API Gateway in Microservices?
Let’s imagine that you are developing an e-commerce application like eBay, or Amazon, In both applications, we can see a shopping cart like below,
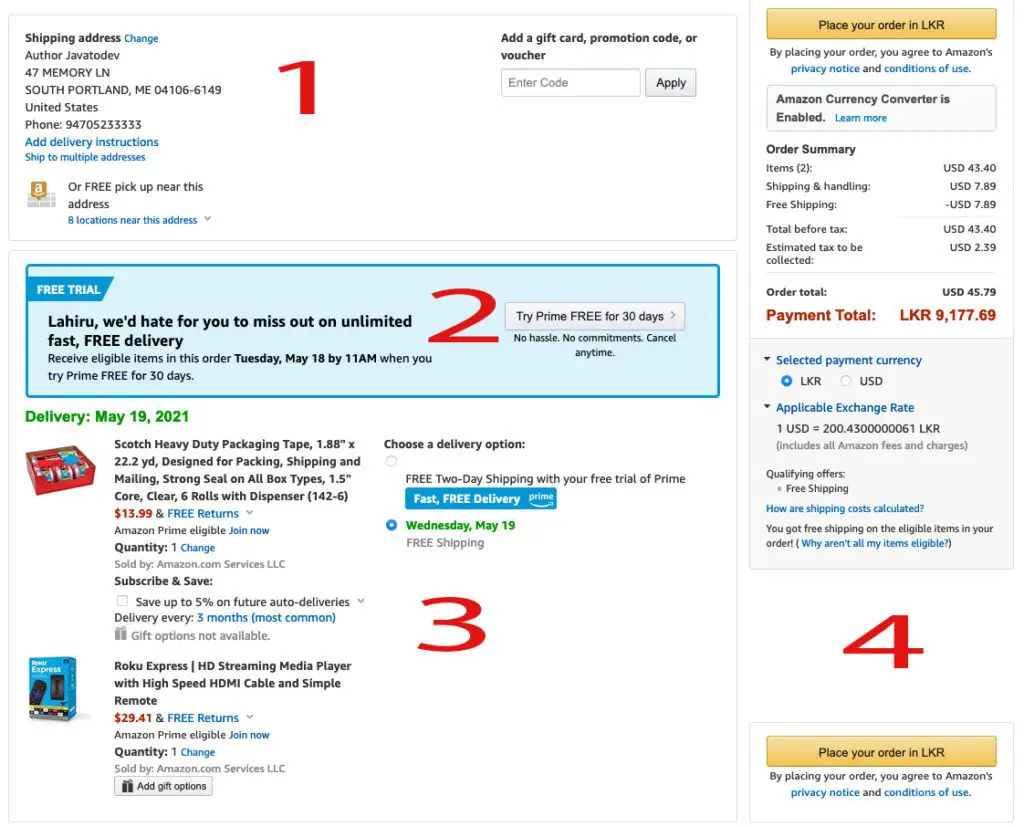
Amazon Checkout Page
If we divide API services that we could use here depending on that we used microservice architecture, there will be 4 main services to consume in order to load this view,
-
User addresses – User service
-
Promotions – promotions service
-
Products Details – Product service
-
Payment details and calculations – Payments service
So If I’m the frontend developer who consumes this API as a client, I need to call multiple backend services, Just to load this view. There are two ways of calling those APIS.
- Direct client-microservice communication. – As a theory, we could call any directly from a client. But here there are few issues like hard to refactor microservices since those services are directly accessing by clients, some services might use protocols that are not web‑friendly, Hence there are really minimal places that we can see they are using a direct client to microservice communication in modern applications.
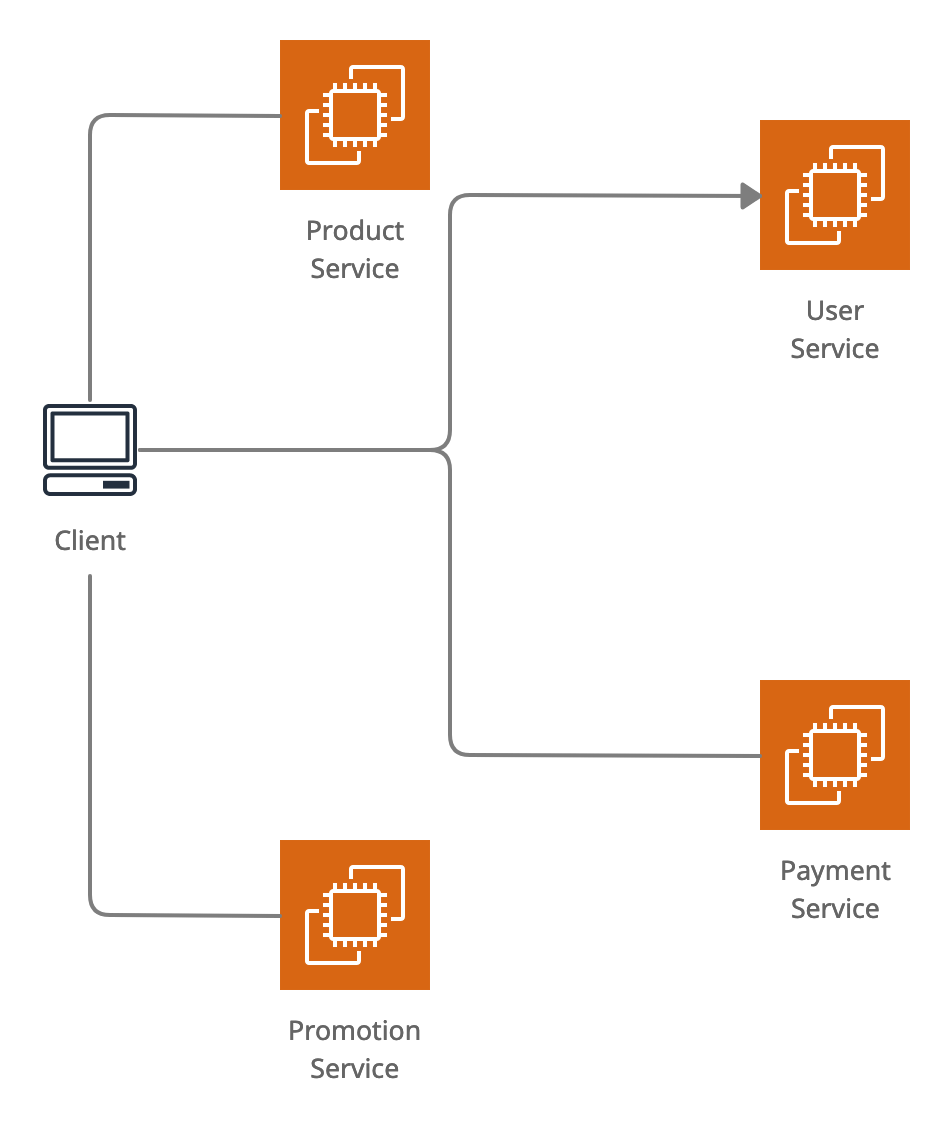
Microservices Communication as a direct client to service
- API gateway microservice communication. – This is the most common practice in building communication between clients to service in microservices. In API Gateway there will be a single entry point to access services, and It encapsulates the internal system and return an API that tailored for clients.
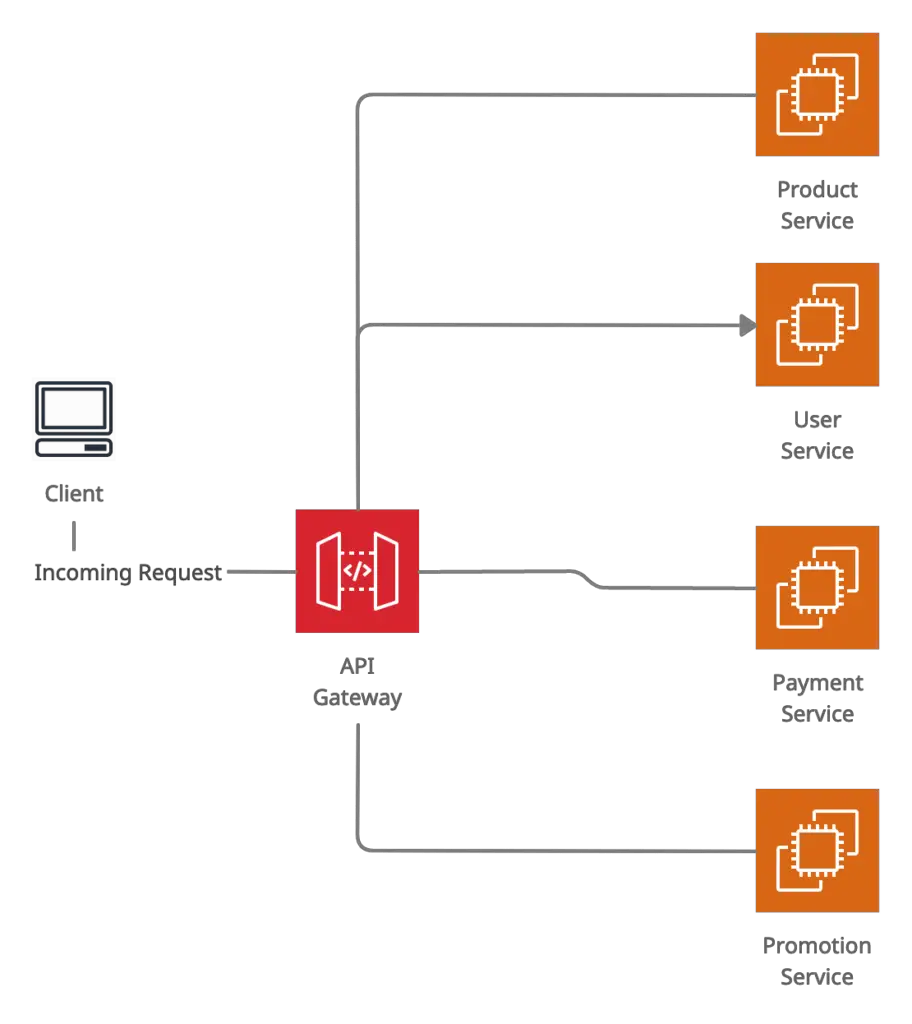
Microservice communication via a API gateway
Setting Up API Gateway
So we have configured the base setup for this API gateway at the end of our previous article in this series about Microservices – Service Registration and Discovery With Spring Cloud Netflix Eureka. So just open the API gateway project and add the following dependency to it.
If you are building an API gateway for your own project, Just add the following libraries and create a spring boot application using spring initializr.
- Eureka Discovery Client.
- Spring Cloud Gateway.
- Spring Boot Actuator.
Don’t include spring-boot-starter-web with this API Gateway. Since there will be an error as follows since spring MVC is not compatible with Spring Cloud Gateway.
Spring MVC found on classpath, which is incompatible with Spring Cloud Gateway at this time. Please remove spring-boot-starter-web dependency.
So basically this is the gradle dependencies list I’ve for the moment,
dependencies {
    implementation 'org.springframework.boot:spring-boot-starter-actuator'
    implementation 'org.springframework.cloud:spring-cloud-starter-gateway'
    implementation 'org.springframework.cloud:spring-cloud-starter-netflix-eureka-client'
}
Now we have all the dependencies that we need to have in our API gateway application. So now let’s configure the Routes and other API gateway specific configurations to use this in our project. Before that just confirm you have configured API gateway as a Eureka Client for this project. Otherwise, you couldn’t use discovery functions to identify the correct API from the service registry.
If that configuration is not there just add @EnableEurekaClient to the main class of API Gateway.
package com.javatodev.finance;

import org.springframework.boot.SpringApplication;
import org.springframework.boot.autoconfigure.SpringBootApplication;
import org.springframework.cloud.netflix.eureka.EnableEurekaClient;

@EnableEurekaClient
@SpringBootApplication
public class InternetBankingApiGatewayApplication {

    public static void main(String[] args) {
        SpringApplication.run(InternetBankingApiGatewayApplication.class, args);
    }

}
Then add configurations to connect with the service registry,
spring:
  application:
    name: internet-banking-api-gateway

server:
  port: 8082

eureka:
  client:
    service-url:
      defaultZone: http://localhost:8081/eureka
Configuring API Gateway Routes With Spring Cloud Gateway
As I discussed earlier on Service Registration and Discovery With Spring Cloud Netflix Eureka for the moment we have enabled service discovery for this service collection. Hence we can use that discovery capability to build routing inside the microservice ecosystem using spring cloud gateway.
So what’s the basic setup that we are going to configure in this stage? Here I’ll go to deploy 2 other services (internet-banking-user-service/ internet-banking-fund-transfer-service) which we need to have in our next step to demo the routing phase on this microservice application.
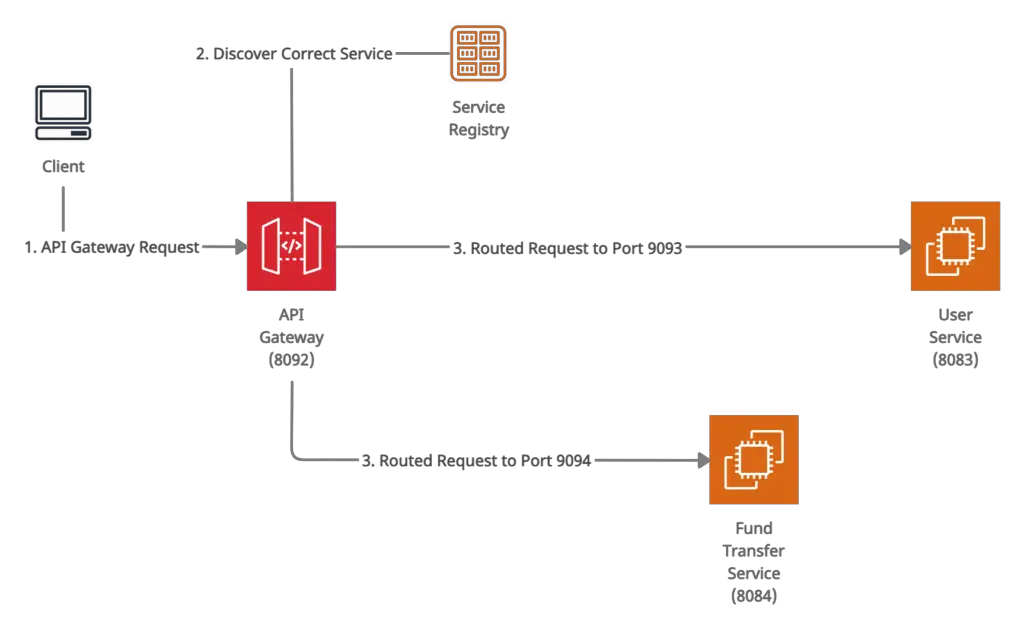
Request Routing Using Spring Cloud Gateway
when a client sends a request to the API gateway, It will discover the correct service IP and PORT using the service registry to communicate and route the request.
So let’s see how we can define routes for these services, For the moment Just imagine user-service is running on http://localhost:8083 and fund transfer service running on http://localhost:8084 while API Gateway is running on 8082.
Configure Routes Using Properties
So just add the following configurations to the API gateway application properties.
spring:
  application:
    name: internet-banking-api-gateway

server:
  port: 8082

eureka:
  client:
    service-url:
      defaultZone: http://localhost:8081/eureka
spring:
  application:
    name: internet-banking-api-gateway

  ##GATEWAY CONFIGURATIONS
  cloud:
    gateway:
      routes:
        ## USER SERVICE
        - id: internet-banking-user-service
          uri: lb://internet-banking-user-service
          predicates:
            - Path=/user/**
          filters:
            - StripPrefix=1
        ## FUND TRANSFER SERVICE
        - id: internet-banking-fund-transfer-service
          uri: lb://internet-banking-fund-transfer-service
          predicates:
            - Path=/fund-transfer/**
          filters:
            - StripPrefix=1

server:
  port: 8082

eureka:
  client:
    service-url:
      defaultZone: http://localhost:8081/eureka
If you are using application.properties define all the routes as below,
spring.cloud.gateway.routes[0].id=banking-core-user-service
spring.cloud.gateway.routes[0].uri=lb://internet-banking-fund-transfer-service
spring.cloud.gateway.routes[0].predicates[0]=Path=/user/**
spring.cloud.gateway.routes[0].filters[0]=StripPrefix=1
What are the properties that we set for API gateway routes ?
-
id – This is just an identification of the routes. You are free to use any kind of alphanumeric value here and I’m going to use the service name which I’ve defined in destination service.
-
URI – Here we can use both http://localhost:8083 and lb://internet-banking-user-service, But if we need to use the inbuilt load balancer on Netflix Eureka server, we should use lb://internet-banking-user-service, Then API registry will takeover the request and show load-balanced request destination to the API gateway.
-
predicates – In here we can set multiple paths to identify a correct routing destination. Eg:- If the API gateway gets and request like http://localhost:8082/user then it will be routed into the http://localhost:8083.
-
filters – Here, you can modify requests and responses before or after sending the downstream request. Here I’m removing prefix we setting to identify the correct API, Otherwise, http://localhost:8082/user will route into http://localhost:8083/user
Now I can route requests from API gateway to services inside the eco-system as follows,
-
http://localhost:8082/**user**/actuator/info -> http://localhost:8083/actuator/info
-
http://localhost:8082/**fund-transfer**/actuator/info -> http://localhost:8084/actuator/info
Now we are ready with our API gateway + routing setup. Let’s test the routes working properly. Before that start all the components including API Registry project, API Gateway, User service and Fund Transfer Service.
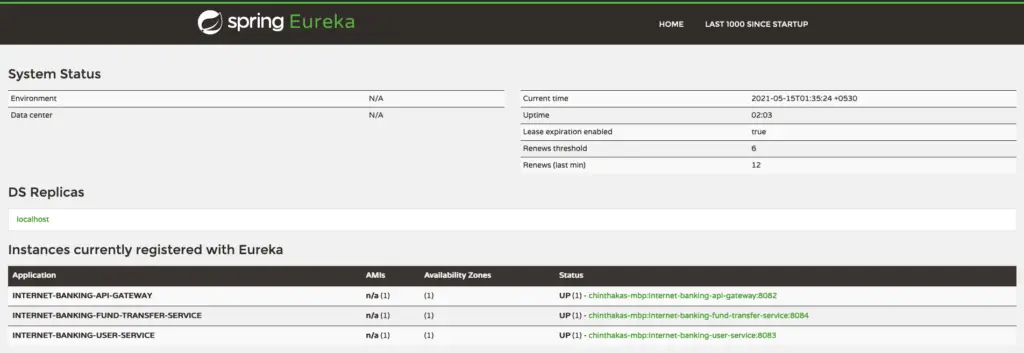
Spring Eureka Dashboard with All The Components Up and Running
Then send two HTTP GET requests to our API Gateway endpoints as below,
### CHECK USER SERVICE INFO
GET http://localhost:8082/user/actuator/info

### CHECK FUND TRANSFER INFO
GET http://localhost:8082/fund-transfer/actuator/info
and the response will be like below,
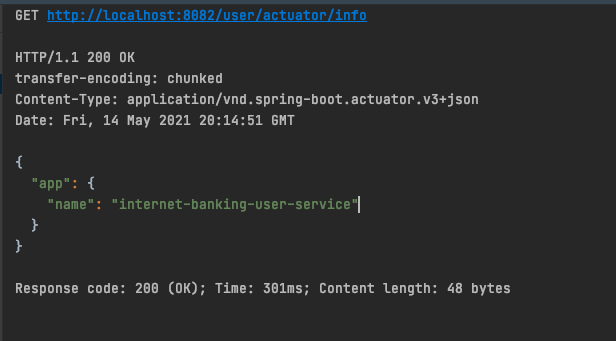
HTTP output from user API call through Spring Cloud Gateway
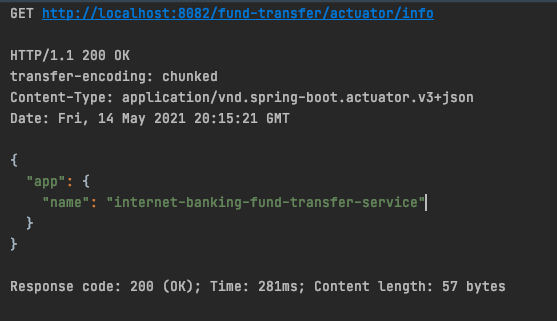
HTTP output from fund-transfer API call through Spring Cloud Gateway
Conclusion
Thanks for reading our latest article on Setup API Gateway Using Spring Cloud Gateway which is most modern and mostly used java API gateway with practical usage.
If you are looking for spring boot based practical application development tutorials, just check our article series.
You can get the source code for this tutorial from our GitHub repository.
