Microservices - Communication With Spring Cloud OpenFeign
-
 Chinthaka Dinadasa
 - 16 Nov, 2021
Microservices communication, one of the popular topics inside modern microservices application developments. Here in this article, I’m going to explain how we can build a communication layer between services in spring boot microservices using Spring Cloud OpenFeign.
Additionally, in this article, I will cover HTTP based communication, and let’s build the same setup with messaging based communication in a future articles.
Brief Requirement
As of now, we have developed a base microservices internet banking solution with our previous articles. Please use this link to access all the resources if you didn’t checked.
Up to now all the necessary services are capable of processing their internal processors without getting 3rd party services involved. (Eg:- Fund transfer service could process a transfer for given accounts.). But for the moment we have a missing part, Which is communicating with Banking Core Service to validate accounts, user ID, etc.
With this implementation, we are allowing the following services to communicate with the banking core service.
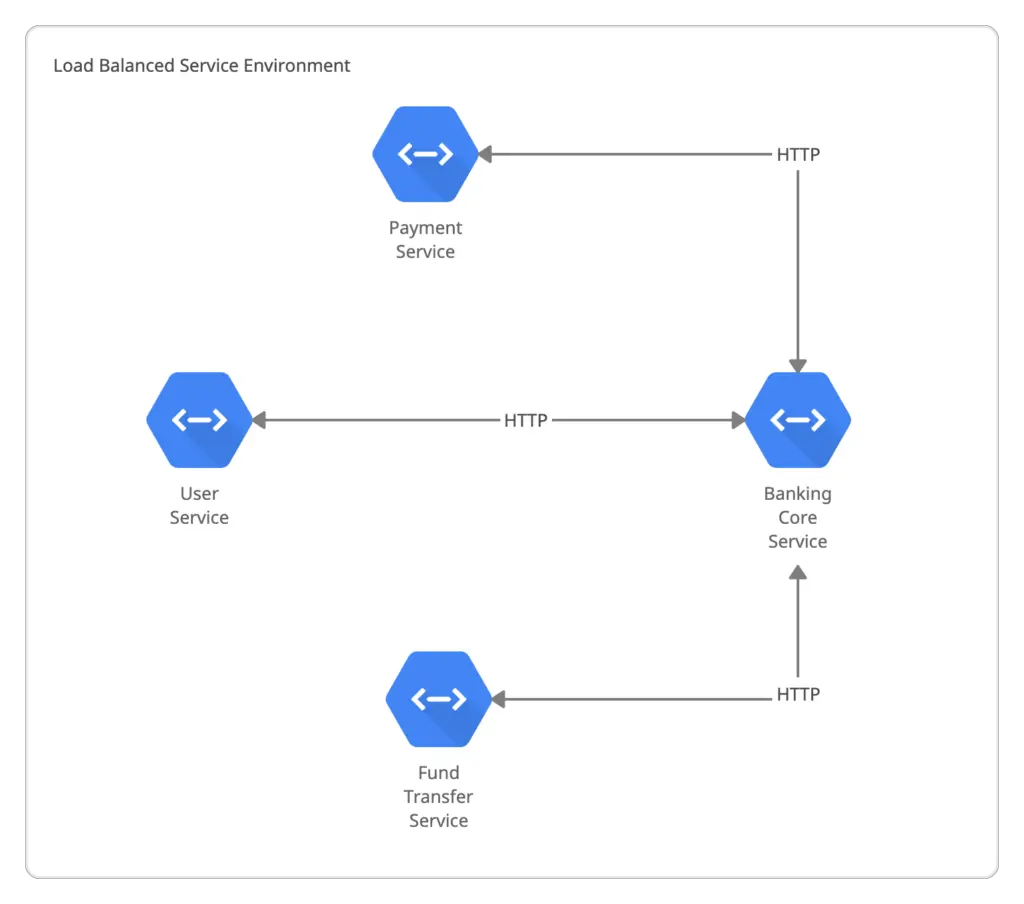
Microservices Communication Architecture Diagram
Here I’m going to use Spring Cloud OpenFeign as the REST API client and configure it with spring boot based microservices.
If you are new to spring cloud openfeign just check our articles on spring boot and feign client implmentations on REST API communication.
You can get the source code for this tutorial from our GitHub repository, Please checkout to feature/microservices-communication-openfeign-base in order to go forward with the steps below.
User Service
Requirement
- User service needs to communicate with core banking service in order to retrieve user specific data under given user identification (NIC/Passport/DL).
- API URL – http://localhost:8083/api/v1/user/
– GET
- API URL – http://localhost:8083/api/v1/user/
Implementation
First, include the open feign dependency in the build.gradle.
implementation 'org.springframework.cloud:spring-cloud-starter-openfeign'
Then enable feign clients from the main class of internet-banking-user-service,
package com.javatodev.finance;

import org.springframework.boot.SpringApplication;
import org.springframework.boot.autoconfigure.SpringBootApplication;
import org.springframework.cloud.netflix.eureka.EnableEurekaClient;
import org.springframework.cloud.openfeign.EnableFeignClients;

@EnableFeignClients
@EnableEurekaClient
@SpringBootApplication
public class InternetBankingUserServiceApplication {

    public static void main(String[] args) {
        SpringApplication.run(InternetBankingUserServiceApplication.class, args);
    }

}
After that, we need to have a feign API client with the necessary methods, requests, and responses.
AccountResponse.java to map Accounts under a given user id,
package com.javatodev.finance.model.rest.response;

import lombok.Getter;
import lombok.Setter;

import java.math.BigDecimal;

@Getter
@Setter
public class AccountResponse {
    private String number;
    private BigDecimal actualBalance;
    private Integer id;
    private String type;
    private String status;
    private BigDecimal availableBalance;
}
UserResponse.java to map user specific details along with account details,
package com.javatodev.finance.model.rest.response;

import lombok.Getter;
import lombok.Setter;

import java.util.List;

@Getter
@Setter
public class UserResponse {
    private String firstName;
    private String lastName;
    private List<AccountResponse> bankAccounts;
    private String identificationNumber;
    private Integer id;
    private String email;
}
Finally, the REST API client that communicates with banking-core-service.
Here our API URL is http://localhost:8083/api/v1/user/
Here be aware that we need to use feign client correct name which registered with the service registry.
package com.javatodev.finance.service.rest;

import com.javatodev.finance.model.rest.response.UserResponse;
import org.springframework.cloud.openfeign.FeignClient;
import org.springframework.web.bind.annotation.PathVariable;
import org.springframework.web.bind.annotation.RequestMapping;
import org.springframework.web.bind.annotation.RequestMethod;

@FeignClient(name = "core-banking-service")
public interface BankingCoreRestClient {

    @RequestMapping(method = RequestMethod.GET, value = "/api/v1/user/{identification}")
    UserResponse readUser(@PathVariable("identification") String identification);

}
Finally, change the UserService createUser method as below, Here I’m reading user data by given NIC and validate is present on the core bank side and after that validate the given email with email present in the core banking system.
public User createUser(User user) {

        List<UserRepresentation> userRepresentations = keycloakUserService.readUserByEmail(user.getEmail());
        if (userRepresentations.size() > 0) {
            throw new RuntimeException("This email already registered as a user. Please check and retry.");
        }

        UserResponse userResponse = bankingCoreRestClient.readUser(user.getIdentification());

        if (userResponse.getId() != null) {

            if (!userResponse.getEmail().equals(user.getEmail())) {
                throw new RuntimeException("Incorrect email. Please check and retry.");
            }

            UserRepresentation userRepresentation = new UserRepresentation();
            userRepresentation.setEmail(userResponse.getEmail());
            userRepresentation.setEmailVerified(false);
            userRepresentation.setEnabled(false);
            userRepresentation.setUsername(userResponse.getEmail());

            CredentialRepresentation credentialRepresentation = new CredentialRepresentation();
            credentialRepresentation.setValue(user.getPassword());
            credentialRepresentation.setTemporary(false);
            userRepresentation.setCredentials(Collections.singletonList(credentialRepresentation));

            Integer userCreationResponse = keycloakUserService.createUser(userRepresentation);

            if (userCreationResponse == 201) {
                log.info("User created under given username {}", user.getEmail());

                List<UserRepresentation> userRepresentations1 = keycloakUserService.readUserByEmail(user.getEmail());
                user.setAuthId(userRepresentations1.get(0).getId());
                user.setStatus(Status.PENDING);
                user.setIdentification(userResponse.getIdentificationNumber());
                UserEntity save = userRepository.save(userMapper.convertToEntity(user));
                return userMapper.convertToDto(save);
            }

        }

        throw new RuntimeException("We couldn't find user under given identification. Please check and retry");

    }
I’ll only add a communication layer for internet banking-user-service for this tutorial and there are multiple places like fund transfer service and utility payment service which we need to communicate with banking core service. Refer to the shared code base for all the fully completed sources including other API communication layers.
Testing API with Postman
Start all the services including service registry, API gateway, user service, and banking core service, and create a user with the correct NIC, email present on the banking core service database.
Here are a few screenshots while testing the user service API using Postman, and you can access the same collection using the below link.

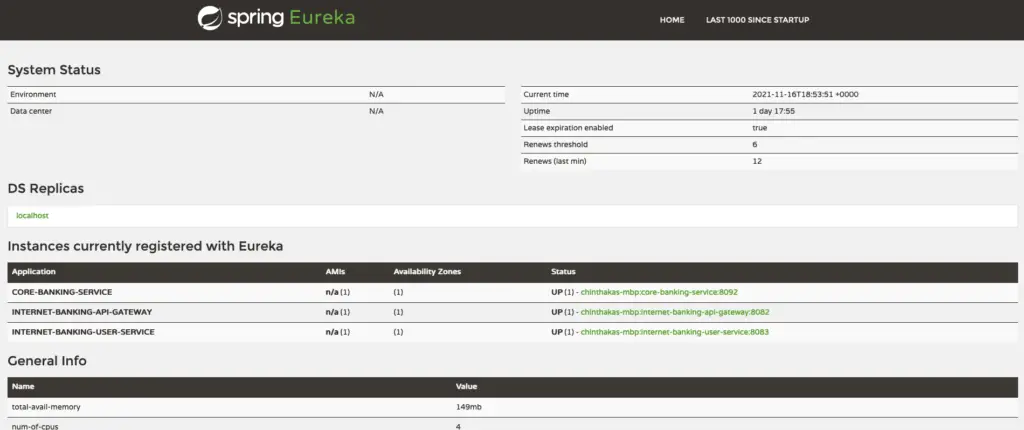
Spring Eureka Service Registry – Microservices – Communication With Spring Cloud OpenFeign
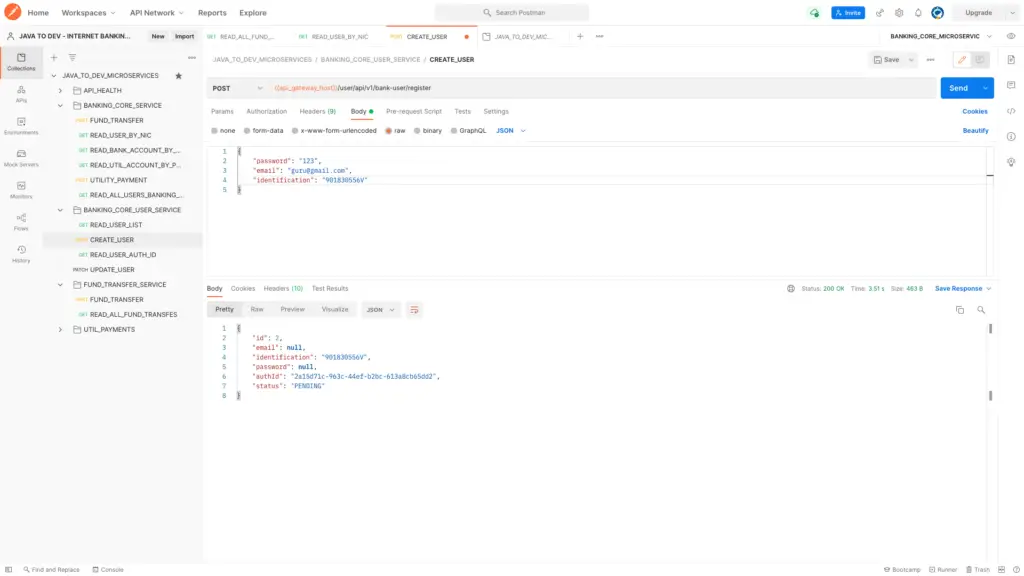
Microservices – Communication With Spring Cloud OpenFeign
Conclusion
Thanks for reading our latest article on Microservices – Communication With Spring Cloud OpenFeign with practical usage.
If you are looking for spring boot practical application development tutorials, just check our article series.
You can get the source code for this tutorial from our GitHub repository.