How to Create a Spring Boot Project
-
 Chinthaka Dinadasa
 - 02 Oct, 2020
Hi, fellow readers let’s start our fresh topic SpringBoot with How to create a spring boot project. Spring was a well-evolved java based framework to develop web applications. Within the past few years of the time, Spring has introduced its newest addition, Spring Boot to create a well-written, easily configurable, just running level Spring application. Let’s start with how we can create a spring boot app easily.
Topics I’m going to discuss,
- Create Spring Boot Project Using Spring Initializr
- More hard ways to generate Spring Boot Project
- Conclusion
Create Spring Boot Project Using Spring Initializr
This is the quickest way to create a spring boot project since spring Initializr could generate an application with whatever the dependencies you need within minutes. To generate an application just visit the spring Initializr website.
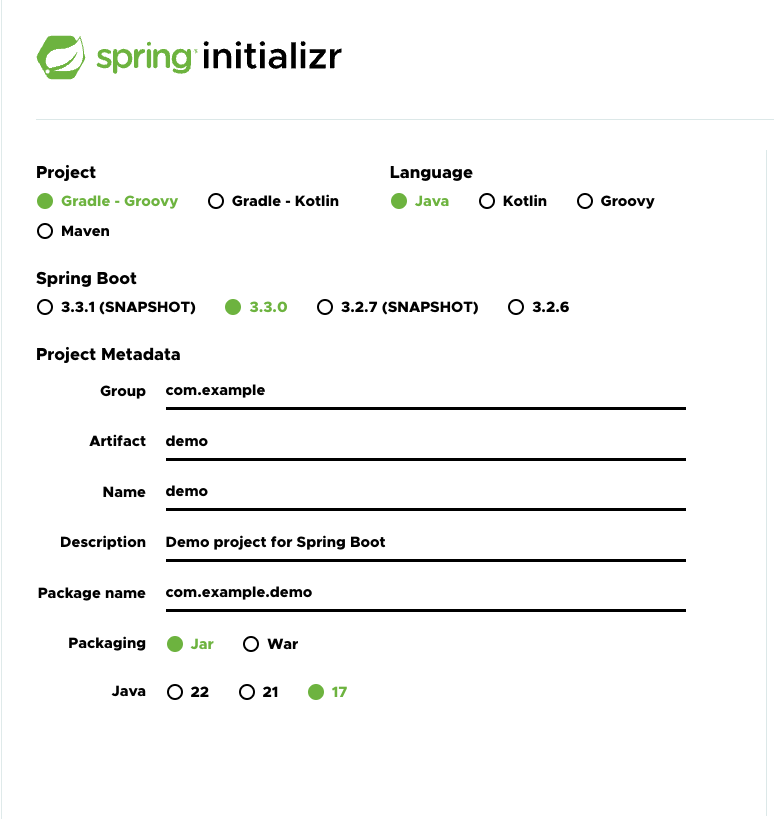 Spring Initializr web window to create spring boot project.
Introduction to Spring Initializr
On that website, you can choose how you need to generate your spring boot application and what are the dependencies which you need to add. You can start by choosing the project building tool you are going to use for your project between maven and Gradle. I’ll go for Gradle which is really easy and a little bit advance while comparing to maven.
Spring Initializr supports multiple languages that run on JVM including java. So you can choose any language which you prefer. I’ll go with Java.
Choosing a Spring Boot Version
Here you can see there are multiple versions that are published on this website. So what are the meanings of these versions?
Let’s start with famous SNAPSHOT versions. Mainly snapshot versions are not the stable versions. But you can use the SNAPSHOT version with your application. But keep in mind that these versions are not stable.
Secondly, there are versions named with M3 in the above screenshot. So M meaning Milestone. So here the latest stable version is on 2.3.4 and M3 is coming with 2.4.0(M3), Basically, 2.4.0(M3) is a stable milestone release which will release in the future. But this is not stable too.
So what we should choose? Here you can see 2.3.4 / 2.2.10 and 2.1.7 versions which are from a stable spring boot release. Just go for a stable release and the latest one for the latest updates. So here it is 2.3.4.
In addition to that, there are few more types of releases are coming to spring boot. Those are PRE and GA releases. GA (General Availability) are versions that have been released to the public. A version that has had this status for once will never change its contents. PRE(pre release) versions will also not change but are only released to let developers test the features of an upcoming GA release. They might contain some bugs that will be fixed in a later pre-release of the same version.
Other than that you can choose whatever the group, artifact name, project name, base package name, packaging, and java version as you preferred.
Why we don’t need to create Spring boot with WAR packaging?
WAR (Web ARchive), was the most famous packaging type which developers used to develop web-based solutions with Java. Since these types of applications could deploy on application containers. But with Spring Boot you don’t need to rely on WAR, you can just choose JAR packaging type and it will run as a web application too. This is happening since spring boot has an embedded web server that runs underneath. After all, if you need to run your spring boot application on your application container just use WAR for packaging. or else start with Jar and you can move JAR to WAR in the future.
Choosing dependencies
Up to now, we are ready with the base spring boot project. Now we need to choose the dependencies which are not coming default with Spring Boot. Selecting the dependencies is highly depends on the requirement you have. But anyway just choose, Spring Web which adds the capability to act as a web application to spring boot. Adding Spring Web could be enough in order to write REST API endpoints and expose them using spring boot.
If you need more dependencies just choose them and Spring Initializr will gather compatible versions automatically and return you the pre-configured spring boot project. Press generate after you have selected all the necessary parameters and dependencies.
Use this link and it will generate whatever the project I’ve generated. Then it will be downloaded into your computer as a zip archive. Then just extract and import the project into your favorite editor.
Generate with Spring Initializr Plugin in IntelliJ Idea
IntelliJ IDEA is one of the famous development IDE and they have integrated spring initialize plugin with their ecosystem to generate any kind of spring boot application. To generate a project you just need to File -> New -> Project and choose Spring Initializr.
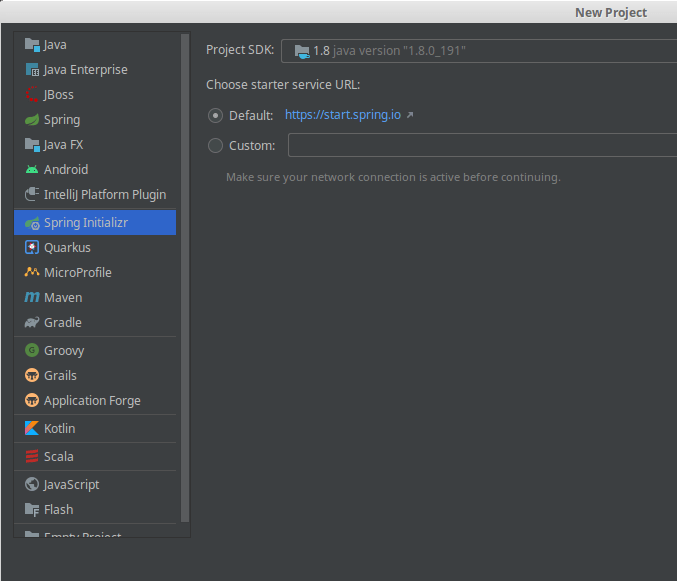 Spring Initializr In IntelliJIdea
More hard ways to generate Spring Boot Project
Using spring Initializr is the quickest and easiest way to create a spring boot application. in addition to that, there are methods that we could generate a spring boot based application. We can create a spring boot project using Gradle or maven by adding whatever the dependencies and starters to that project.
Conclusion
Here we have discussed the ways that we could generate or create a spring boot project from scratch. Additionally, there are thousands of awesome dependencies which we could integrate with spring boot to write awesome applications.
Thanks for reading our first article on Spring Boot. Keep in touch and don’t forget to bookmark us for more interesting articles related to Java and Spring boot from JavatoDev.com
