How to Handle exceptions in Spring Boot REST API using Global Exception Handler
-
 Chinthaka Dinadasa
 - 08 Oct, 2020
Exception handling is one of the core concepts which is really necessary when we build an application using spring boot. So in REST API development, it carries a bigger role. So in this tutorial, I’m going to explain how we can configure exception handling in spring boot REST API.
The main topics we are going to discuss here are,
Table of Contents
Open Table of Contents
- Create a new spring boot project
- Adding Required Dependencies
- Implementing Endpoints
- Global Exception Handler in Spring Boot
- Defining Custom Exceptions
- Throwing Exceptions
- Testing API
- Using Localization (i18n) with Custom Exceptions Handling in Spring Boot
- Conclusion
Technologies Going to Use,
- Spring Boot: 2.3.4.RELEASE
- Spring Data
- Spring Cloud OpenFeign
- Lombok
- Gradle
- Intellij Idea for IDE
Final project structure,
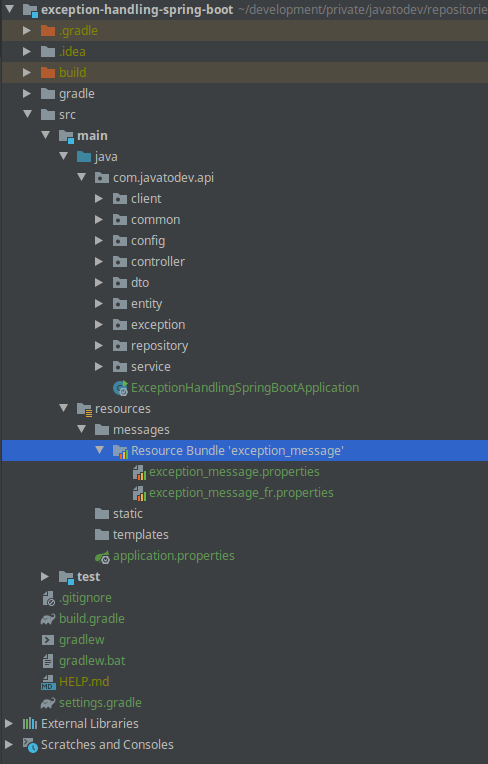
final project structure exception handling spring boot
Create a new spring boot project
Here I’m going to use spring initializr to generate a spring boot project with all the dependencies I need for this tutorial. If you are really new to Spring Boot, Please follow our article on How to Create a Spring Boot Project.
Adding Required Dependencies
Here we are going to demonstrate how we can capture exceptions with spring data with MySQL database accessing, and few common business exceptions.
In this tutorial, I will create a few endpoints with accessing the MySQL database using spring data. additionally, there will be a feign interface that communicates with the 3rd party API. So I’ll explain how we can capture exceptions or errors from inside the API and outside the API in Spring Boot.
I’m going to use Lombok for annotation processing. If you need to learn how we can use lombok in spring boot follow our article Guide to use Lombok In Spring Boot.
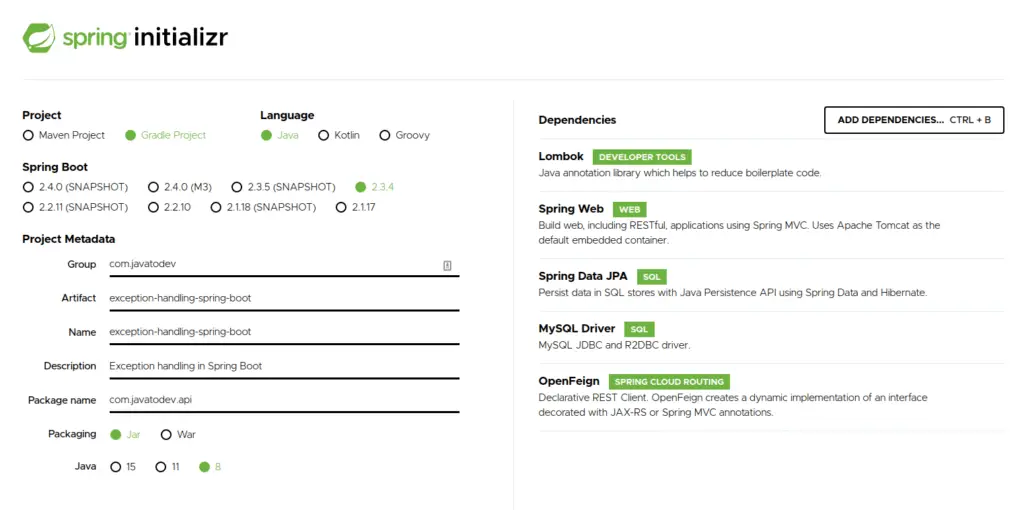
Generating Spring Boot Project Using Spring Initializr
if you are using Gradle based project just add the following dependencies into the build.gradle
implementation 'org.springframework.boot:spring-boot-starter-data-jpa' implementation 'org.springframework.boot:spring-boot-starter-web'
implementation 'org.springframework.cloud:spring-cloud-starter-openfeign' compileOnly 'org.projectlombok:lombok'
runtimeOnly 'mysql:mysql-connector-java'
annotationProcessor 'org.projectlombok:lombok'
or else if you are using a maven project, add the following dependencies into the pom.xml.
<dependency>
      <groupId>org.springframework.boot</groupId>
      <artifactId>spring-boot-starter-data-jpa</artifactId>
    </dependency>
    <dependency>
      <groupId>org.springframework.boot</groupId>
      <artifactId>spring-boot-starter-web</artifactId>
    </dependency>
    <dependency>
      <groupId>org.springframework.cloud</groupId>
      <artifactId>spring-cloud-starter-openfeign</artifactId>
    </dependency>
    <dependency>
      <groupId>mysql</groupId>
      <artifactId>mysql-connector-java</artifactId>
      <scope>runtime</scope>
    </dependency>
    <dependency>
      <groupId>org.projectlombok</groupId>
      <artifactId>lombok</artifactId>
      <optional>true</optional>
    </dependency>
Implementing Endpoints
Before implementing API endpoints, let’s add database connection properties into application.properties.
spring.jpa.hibernate.ddl-auto=update
spring.datasource.url=jdbc:mysql://127.0.0.1:3306/java_to_dev_main_db
spring.datasource.username=root
spring.datasource.password=password
Now we are ready to develop the API part with accessing the MySQL database and 3rd Party API.
Defining Entity Classes
Here I’ll create simple table with naming user in the database and access it via a repository and service to the controller.
UserEntity.java
package com.javatodev.api.entity;

import com.javatodev.api.common.UserStatus;

import javax.persistence.Entity;
import javax.persistence.GeneratedValue;
import javax.persistence.GenerationType;
import javax.persistence.Id;
import javax.persistence.Table;

import lombok.Getter;
import lombok.Setter;

@Getter
@Setter
@Entity
@Table(name = "user")
public class UserEntity {

    @Id
    @GeneratedValue(strategy = GenerationType.AUTO)
    private Long id;
    private String username;
    private String password;
    private UserStatus userStatus;

}
UserStatus.java – This is a enum to keep user status.
package com.javatodev.api.common;

public enum UserStatus {
    REGISTERED, ANONYMOUS, PENDING, BLOCKED
}
DTO class to bring data from data access layer to Controller level. Here we are only exposing username and userstatus via the API. hence we are using this DTO class return the data from data layer.
User.java
package com.javatodev.api.dto;

import com.javatodev.api.common.UserStatus;

import lombok.Data;

@Data
public class User {
    private String username;
    private UserStatus userStatus;
}
Now we have the basic layers in order to access the database. But we are missing the repository which will be used as the interface which extended with JPA specific feature. This Repository layer will be a simple interface with extending default features from JpaRepostitory. Such as Save, FindAll, FindById, etc.
UserRepository.java
package com.javatodev.api.repository;

import com.javatodev.api.entity.UserEntity;

import org.springframework.data.jpa.repository.JpaRepository;

import java.util.Optional;

public interface UserRepository extends JpaRepository<UserEntity, Long> {
    Optional<UserEntity> findUserEntitiesByUsername(String username);
}
Now we have the capability to access the data layer using our UserRepository implementation. If we need many more methods to access databases, we can implement those inside this repository as abstract methods. Here the custom implementation is there to read users by username and return Optional
Service and Rest Controller
Now we need to have two more components to build our API. First, we should add a new service to access the Repository and return responses to the controller layer.
UserService.java
package com.javatodev.api.service;

import com.javatodev.api.common.UserStatus;
import com.javatodev.api.dto.User;
import com.javatodev.api.entity.UserEntity;
import com.javatodev.api.repository.UserRepository;

import org.springframework.beans.BeanUtils;
import org.springframework.stereotype.Service;

import java.util.Optional;
import java.util.UUID;

import lombok.RequiredArgsConstructor;

@Service
@RequiredArgsConstructor
public class UserService {

    private final UserRepository userRepository;

    public void createUser(User user){
        UserEntity userEntity = new UserEntity();
        userEntity.setUsername(user.getUsername());
        userEntity.setPassword(UUID.randomUUID().toString());
        userEntity.setUserStatus(UserStatus.PENDING);
        userRepository.save(userEntity);
    }

    public User readUserByUsername(String username) {
        Optional<UserEntity> userEntitiesByUsername = userRepository.findUserEntitiesByUsername(username);
        User user = new User();
        BeanUtils.copyProperties(userEntitiesByUsername.get(), user);
        return user;
    }
}
This service is capable of writing new users into the database and read user by username from the database.
The last layer which is RestController capable of exposing these services as REST API.
UserController.java
package com.javatodev.api.controller;

import com.javatodev.api.dto.User;
import com.javatodev.api.service.UserService;

import org.springframework.http.ResponseEntity;
import org.springframework.web.bind.annotation.*;

import lombok.RequiredArgsConstructor;

@RestController
@RequestMapping(value = "/api/v1/user")
@RequiredArgsConstructor
public class UserController {

    private final UserService userService;

    @GetMapping("/{username}")
    public ResponseEntity readUser (@PathVariable String username) {
        return ResponseEntity.ok(userService.readUserByUsername(username));
    }

    @PostMapping
    public ResponseEntity createUser(@RequestBody User user){
        userService.createUser(user);
        return ResponseEntity.ok().build();
    }

    @GetMapping("/airline/{airlineId}")
    public ResponseEntity createUser(@PathVariable String airlineId){
        return ResponseEntity.ok(userService.readAirline(airlineId));
    }

}
Now we are ready to launch our application by accessing the MySQL database using spring boot. But for this tutorial, I need to add one more layer which is consuming 3rd party API using Spring Cloud OpenFeign.
If you need to get a good understanding of how to feign is working and How to Use Feign Client in Spring Boot just follow our articles about open Feign.
Add following properties which is used by feign client to the application.properties
app.feign.config.name=instantwebtools-api
app.feign.config.url=https://api.instantwebtools.net/v2/
feign.client.config.default.connect-timeout=20000
feign.client.config.default.read-timeout=20000
This feign client consume Free Auth Enabled Fake Rest API from instantwebtools.net.
Then implement InstantWebToolsAPIClient.java
package com.javatodev.api.client;

import org.springframework.cloud.openfeign.FeignClient;
import org.springframework.web.bind.annotation.PathVariable;
import org.springframework.web.bind.annotation.RequestMapping;
import org.springframework.web.bind.annotation.RequestMethod;

@FeignClient(value = "${app.feign.config.name}", url = "${app.feign.config.url}")
public interface InstantWebToolsApiClient {

    @RequestMapping(method = RequestMethod.GET, value = "/airlines/{airlineId}")
    String readAirLineById(@PathVariable String airlineId);

}
Then add following annotation to the main class of your application in order to activate feign clients.
@EnableFeignClients
public class ExceptionHandlingSpringBootApplication
Now we are ready to consume API using feign client and our base application and its logic with all the components are ready to serve.
Global Exception Handler in Spring Boot
There were times that we need to implement exception handlers at the controller level using @ExceptionHandler. After that, spring had support with DefaultHandlerExceptionResolver, which enabled error codes. Still, the biggest drawback was developers couldn’t add a custom exception body while throwing an exception in spring boot.
Now (After spring 3.2) spring supports a global exception handler using @ControllerAdvice annotation.
Using @ControllerAdvice based global exception handler, we can capture any exception inside the spring boot application, then handle it and return a ResponseEntity with proper HTTP status and Custom Body to the API consumers.
Let’s add GlobalExceptionHandler as below. In this handler, I’ll capture every Exception that happens inside the spring boot application and returns a 400-bad request with a hard-coded message.
package com.javatodev.api.exception.config;

import org.springframework.http.ResponseEntity;
import org.springframework.web.bind.annotation.ControllerAdvice;
import org.springframework.web.bind.annotation.ExceptionHandler;
import org.springframework.web.servlet.mvc.method.annotation.ResponseEntityExceptionHandler;

import java.util.Locale;

@ControllerAdvice
public class GlobalExceptionHandler extends ResponseEntityExceptionHandler {

    @ExceptionHandler({Exception.class})
    protected ResponseEntity handleException(Exception e, Locale locale) {
        return ResponseEntity
            .badRequest()
            .body("Exception occured inside API "+e);
    }

}
Defining Custom Exceptions
There are multiple exceptions that could throw inside a spring boot application. Here I’ll create a few custom exceptions to support the business logic we built in the above API to throw
-
EntityNotFoundException when users are not present on the database.
-
UserAlreadyRegisteredException when a user already registered under a given username,
-
Throwing FeignClientException captured from FeignClient.
So following exception hierarchy will be designed to use in this project.

Exception hierarchy in this project
JavatoDevGlobalException.java – Here, I’ll add an optional parameter to bring readable code, representing the exact exception with HttpStatus and exception body. This is optional, and you can remove it if you don’t need it. But using this approach, you can easily capture the exact error, since all the exception has its code and a message.
package com.javatodev.api.exception;

public class JavatoDevGlobalException extends RuntimeException {

    private Long code;

    public JavatoDevGlobalException (String message, Long code) {
        super(message);
        this.code = code;
    }

}
EntityNotFoundException.java
package com.javatodev.api.exception;

import com.javatodev.api.exception.config.Application;

public class EntityNotFoundException extends JavatoDevGlobalException {

    public EntityNotFoundException(){
        super("Entity Not Found", GlobalErrorCode.ERROR_ENTITY_NOT_FOUND);
    }

    public EntityNotFoundException(String message, Long code) {
        super(message, code);
    }

}
Here I’m creating a default exception constructor with default exception code and default message to use whenever needed. I’ll explain when it’s applicable later.
Additionally I’m using constant class to define error codes and read when we needed as below.
package com.javatodev.api.exception.config;

public class GlobalErrorCode {
    public static final Long ERROR_ENTITY_NOT_FOUND = 1000L;
    public static final Long ERROR_USER_ALREADY_REGISTERED = 1001L;
    public static final Long ERROR_FEIGN_CLIENT = 1002L;
}
There are two more exceptions, which extend JavatoDevGlobalException. I’m not going to show the implementation since it has the same body with the same parameters.
Additionally, I’ll add a class that could represent both code and message while sending as ResponseEntity from a global exception handler.
package com.javatodev.api.exception.config;

import lombok.Builder;
import lombok.Data;

@Data
@Builder
public class ErrorResponse {
    private Long code;
    private String message;
}
Now we have a global exception with multiple child exceptions that could be thrown from everywhere inside the application. So let’s capture the JavatoDevGlobalException exception from our global exception handler, which we developed earlier. So basically, it will allow catching every child exceptions inside the application.
package com.javatodev.api.exception.config;

import com.javatodev.api.exception.JavatoDevGlobalException;

import org.springframework.http.ResponseEntity;
import org.springframework.web.bind.annotation.ControllerAdvice;
import org.springframework.web.bind.annotation.ExceptionHandler;
import org.springframework.web.servlet.mvc.method.annotation.ResponseEntityExceptionHandler;

import java.util.Locale;

@ControllerAdvice
public class GlobalExceptionHandler extends ResponseEntityExceptionHandler {

//Global Exception Handler for JavatoDevGlobalException.
    @ExceptionHandler(JavatoDevGlobalException.class)
    protected ResponseEntity handleGlobalException (JavatoDevGlobalException e, Locale locale) {
        return ResponseEntity
            .badRequest()
            .body(ErrorResponse.builder().code(e.getCode()).message(e.getMessage()).build());
    }


    @ExceptionHandler({Exception.class})
    protected ResponseEntity handleException(Exception e, Locale locale) {
        return ResponseEntity
            .badRequest()
            .body("Exception occured inside API "+e);
    }

}
Throwing Exceptions
Now our global exception handler is configured and ready to handle exceptions happening inside the application. We can add exception throwing where it should be applicable.
Handling exceptions using Optional
First, let’s add the EntityNotFoundException when reading the user by username. Here I’m using Optional
public User readUserByUsername(String username) {
        UserEntity userEntity = userRepository.findUserEntitiesByUsername(username).orElseThrow(EntityNotFoundException::new);
        User user = new User();
        BeanUtils.copyProperties(userEntity, user);
        user.setAirline(readAirline(user.getAirline()));
        return user;
    }
Here Optional
Handling exceptions manually
Now we should add UserAlreadyRegisteredException manually with checking the availability of the user entity from the database.
public void createUser(User user){
        Optional<UserEntity> userEntitiesByUsername = userRepository.findUserEntitiesByUsername(user.getUsername());
        if (userEntitiesByUsername.isPresent()) {
            throw new UserAlreadyRegisteredException("User already registered under given username", GlobalErrorCode.ERROR_USER_ALREADY_REGISTERED);
        }
        UserEntity userEntity = new UserEntity();
        userEntity.setUsername(user.getUsername());
        userEntity.setPassword(UUID.randomUUID().toString());
        userEntity.setUserStatus(UserStatus.PENDING);
        userEntity.setAirlineId(user.getAirline());
        userRepository.save(userEntity);
    }
Now we are ready to handle two exceptions from the internal system. But I’ll explain how to handle exception while using third-party API using feign client.
Here we need additional configuration to introduce ErrorDecoder into the feign communication layer. We can add it using the below code. If you need more clarification, you follow our article about How to Use Feign Client in Spring Boot.
FeignCustomErrorDecoder.java
package com.javatodev.api.client.config;

import com.javatodev.api.exception.FeignClientException;
import com.javatodev.api.exception.config.GlobalErrorCode;

import feign.Response;
import feign.codec.ErrorDecoder;

public class FeignCustomErrorDecoder implements ErrorDecoder {
    @Override public Exception decode(String methodKey, Response response) {
        switch (response.status()) {
            case 400:
                //handle exception
                return new FeignClientException("Bad Request Through Feign", GlobalErrorCode.ERROR_FEIGN_CLIENT);
            case 401:
                //handle exception
                return new FeignClientException("Unauthorized Request Through Feign", GlobalErrorCode.ERROR_FEIGN_CLIENT);
            case 404:
                //handle exception
                return new FeignClientException("Unidentified Request Through Feign", GlobalErrorCode.ERROR_FEIGN_CLIENT);
            default:
                //handle exception
                return new FeignClientException("Common Feign Exception", GlobalErrorCode.ERROR_FEIGN_CLIENT);
        }
    }
}
Create CustomFeignConfiguration.java and introduce error decoder.
package com.javatodev.api.client.config;

import org.springframework.context.annotation.Bean;
import org.springframework.context.annotation.Configuration;

import feign.codec.ErrorDecoder;

@Configuration
public class CustomFeignConfiguration {
    @Bean
    public ErrorDecoder errorDecoder() {
        return new FeignCustomErrorDecoder();
    }
}
Then we can import our custom configuration into our feign client by adding following,
@FeignClient(value = "${app.feign.config.name}", url = "${app.feign.config.url}", configuration = CustomFeignConfiguration.class)
Now we are ready with the whole system plus exception handling with Spring boot. Let’s test the application.
Testing API
Here I’m using VSCode with REST Client for testing.
exception-handling-spring-boot.http
### CREATE USER

POST http://localhost:8080/api/v1/user HTTP/1.1
content-type: application/json

{
   "username": "javatodev"
}

### READ USER BY USERNAME
@username = javatodev_2
GET http://localhost:8080/api/v1/user/{{username}} HTTP/1.1
content-type: application/json

### READ AIRLINE BY ID

@airline_id = 4747474

GET http://localhost:8080/api/v1/user/airline/{{airline_id}} HTTP/1.1

UserAlreadyRegisteredException Handling

EntityNotFoundException Handling

FeignClientException Handling
Using Localization (i18n) with Custom Exceptions Handling in Spring Boot
As we developed, we hardcoded the exception messages when defining. But spring boot allows us to localize messages in exceptions. Here I’ll create two message sources to support English and French locales for exception messages.
Create the following message source files in the src->main->resources->messages folder.
exception_message.properties
exception.user.already.registered=User already registered under a given username, Please try again with a different username.
exception.user.not.found=User not found under given username. Please check the username and retry.
exception.feign.client.communication=Exception occurred while consuming a third party API. Please retry.
exception_message_fr.properties
exception.user.already.registered=Utilisateur déjà enregistré sous un nom d'utilisateur donné, veuillez réessayer avec un nom d'utilisateur différent.
exception.user.not.found=Utilisateur introuvable sous le nom d'utilisateur donné. Veuillez vérifier le nom d'utilisateur et réessayer.
exception.feign.client.communication=Une erreur s'est produite lors de la consommation d'une API tierce. Veuillez réessayer.
After creating message sources in the custom folder, we should introduce those sources to the Spring Boot application using application configurations.
package com.javatodev.api.config;

import org.springframework.context.annotation.Bean;
import org.springframework.context.annotation.Configuration;
import org.springframework.context.support.ResourceBundleMessageSource;

@Configuration
public class ApplicationConfiguration {

    @Bean
    public ResourceBundleMessageSource messageSource() {

        ResourceBundleMessageSource source = new ResourceBundleMessageSource();
        source.setBasenames("messages/exception_message");
        source.setUseCodeAsDefaultMessage(true);
        return source;
    }
}
Then we need to change a few things inside the codebase to support localization. Let’s start with the global exception handler.
Here I’ll change the global exception handler to read error by error code using message sources.
@ExceptionHandler(JavatoDevGlobalException.class)
    protected ResponseEntity handleGlobalException (JavatoDevGlobalException e, Locale locale) {
        return ResponseEntity
            .badRequest()
            .body(ErrorResponse.builder().code(e.getCode()).message(messageSource.getMessage(e.getMessage(),null, locale)).build());
    }
Then we should pass the message code while throwing an exception instead of a hardcoded message. Then Spring will take care of capturing the correct message with the proper locale user request.
throw new UserAlreadyRegisteredException("exception.user.already.registered", GlobalErrorCode.ERROR_USER_ALREADY_REGISTERED);
public EntityNotFoundException(){
        super("exception.user.not.found", GlobalErrorCode.ERROR_ENTITY_NOT_FOUND);
    }
All done now, our API is handling exceptions with localized exception messages.
Exceptions with default English US_en locale.

exception-message-localization-english-spring-boot
The second request set Accept-language: fr, hence spring boot set locale to fr and return an error message using french.

exception-message-localization-french-spring-boot
Conclusion
All done, now we have an understanding of Exception Handling Spring Boot REST API. Here I’ve discussed implementing a global exception handler using @ControllerAdvice, creating custom exceptions, adding localizations to the custom exceptions, and more. Comment your ideas or issues you are facing while configuring exception handling for spring boot.
You can find source codes for this tutorial from our Github.
