Spring Boot REST API CRUD With DynamoDB Tutorial
-
 Chinthaka Dinadasa
 - 04 Nov, 2020
In this article, I’m going to explain how we can use DynamoDB with a Spring Boot application with developing a REST API that covers CRUD operations.
Here I’ll explain how we can use both locally deployed DynamoDB instances and DynamoDB tables created on the AWS console. Additionally, I’ll add steps to follow in creating DynamoDB tables in an AWS console, and how to access those from our spring boot REST API using Spring Data.
Technologies going to use,
- Java 1.8
- Spring Boot 2.3.4 RELEASE
- Spring Data
- AWS Java SDK For Amazon DynamoDB
- Spring Data DynamoDB
- Spring Data Release Train BOM
- Lombok
- Gradle
- IntelliJ Idea for IDE
Main topics I’m going to explain here,
Running DynamoDB Locally
Here I explain the way we could run the DynamoDB local instance using docker. If you are not familiar with Docker deployments please follow this instruction on Deploying DynamoDB Locally on Your Computer.
$ docker run -p 8000:8000 amazon/dynamodb-local -jar DynamoDBLocal.jar -inMemory -sharedDb
Sample output after dynamo DB has started correctly,
Initializing DynamoDB Local with the following configuration:
Port:	8000
InMemory:	true
DbPath:	null
SharedDb:	true
shouldDelayTransientStatuses:	false
CorsParams:	*

ERROR StatusLogger Log4j2 could not find a logging implementation. Please add log4j-core to the classpath. Using SimpleLogger to log to the console...
Keep in mind to add -sharedDB while running DynamoDB with docker otherwise it will create separate databases for separate clients. By using the -sharedDb flag when starting the local DynamoDB, a single database file will be shared for all clients.
Then use ‘NoSQL Workbench for DynamoDB‘ client to access the database.
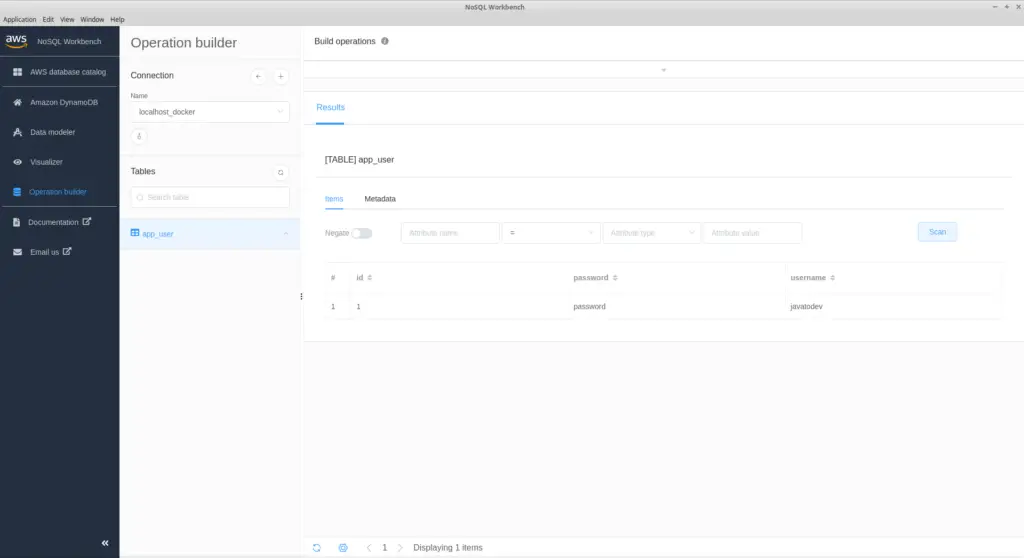
NoSQL workbench for dynamoDB
Adding Required Dependencies
For this tutorial I’ll use spring initializr to generate a spring boot project with all the dependencies I need for this tutorial. If you are really new to Spring Boot, Please follow our article on How to Create a Spring Boot Project.
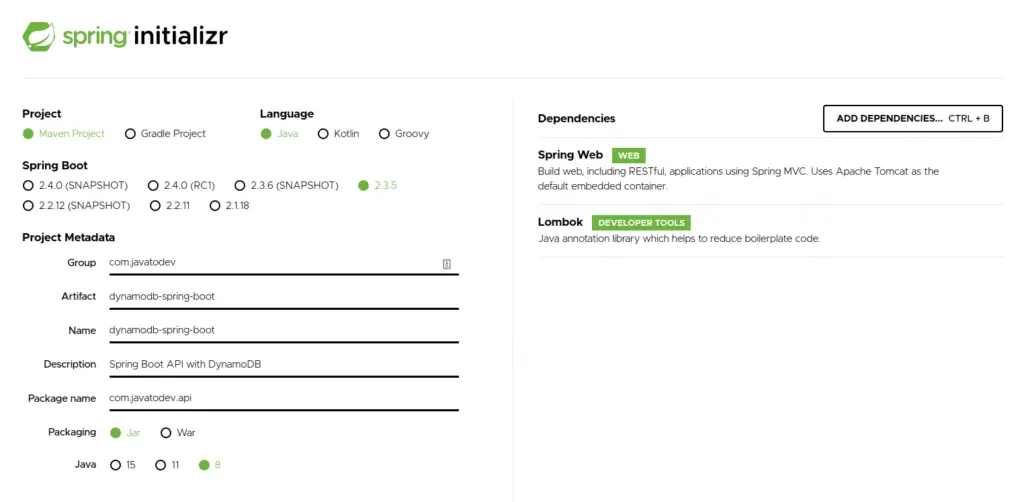
generating spring boot application with spring initializr
Here I’ve selected following dependencies to create spring boot project using spring initilizr,
-
Spring Web – contains common web-specific utilities for both Servlet and Portlet environments.
-
Lombok – The coolest plugin to spicing up your java. Never write another getter or equals method again, with one annotation your class has a fully-featured builder, Automate your logging variables, and much more.
If you need to learn how we can use Lombok in spring boot follow our article Guide to use Lombok In Spring Boot.
Ok now we have our base spring boot project, Now we need to add libraries which allows us to access DynamoDB database.
If you are using Gradle based spring boot application, add the following dependencies to the project.
implementation 'com.amazonaws:aws-java-sdk-dynamodb:1.11.892'
compile group: 'com.github.derjust', name: 'spring-data-dynamodb', version: '5.1.0'
Additionally there is one more additional dependency we should add through dependencyManagement as below.
ext {
    springDataVersion = 'Neumann-SR5'
}

dependencyManagement {
    imports {
        mavenBom "org.springframework.data:spring-data-releasetrain:${springDataVersion}"
    }
}
If you are using Maven based project add above libraries as follows,
<dependencyManagement>
    <dependencies>
    <dependency>
        <groupId>org.springframework.data</groupId>
        <artifactId>spring-data-releasetrain</artifactId>
        <version>Neumann-SR5</version>
        <type>pom</type>
        <scope>import</scope>
        </dependency>
    </dependencies>
</dependencyManagement>
<dependencies>
    <dependency>
        <groupId>com.amazonaws</groupId>
        <artifactId>aws-java-sdk-dynamodb</artifactId>
        <version>1.11.892</version>
    </dependency>
    <dependency>
        <groupId>com.github.derjust</groupId>
        <artifactId>spring-data-dynamodb</artifactId>
        <version>5.1.0</version>
    </dependency>
</dependencies>
Defining API Endpoints
Here I’ll develop REST API with basic CRUD operations to cover functions inside a book library.
In this scenario, there are authors registered in the system. additionally, the author could have multiple books and members should be registered to lend any book from the library.
This same API has been developed using the MySQL and MongoDB databases as well. You can find those tutorials from,
- Spring Boot REST API Using JPA, Hibernate, MySQL Tutorial.
- Spring Boot REST API Using Spring Data MongoDB Tutorial
Our main API endpoints for this tutorial will be,
| Endpoint | HTTP Method | Description |
|---|---|---|
| /api/library/book | GET | Read all books from database. |
| /api/library/book?isbn=1919 | GET | Read book by ISBN |
| /api/library/book/:id | GET | Read book by ID |
| /api/library/book | POST | Register New Book |
| /api/library/book/:id | DELETE | Remove a book |
| /api/library/book/lend | POST | Lend a book to a member |
| /api/library/member | POST | Register member |
| /api/library/member/:id | PATCH | Update a member |
Main API Endpoints for Library API
Basic Architecture Inside The Project
In this tutorial I’m going to use 3 main layers with the architecture, Those are controller, service, and repository layers.
- Controller Layer – This is the place API consumers communicate with, and we define REST path Request Body Responses here. We should only use the controller layer to capture the consumer’s request and pass it to the service layer, then return the service’s response to the consumer.
- Service Layer – We define the business logic with processing data in this layer.
- Repository Layer – We define data reads and writes using a repository layer.

Basic architecture for Spring Boot app with MongoDB
Developing the API
Now we have spring boot project with all the dependencies to access DynamoDB database and locally configured DynamoDB instance. Let’s start the developments of our API.
Configure DynamoDB Connection For Spring Boot
In this case, we just need to introduce 3 values as endpoint, accesskey and secretkey in order to connect with DynamoDB instance. So to do that add following into the applciation.properties or application.yml in your project.
amazon.dynamodb.endpoint=http://localhost:8000/
amazon.aws.accesskey=key
amazon.aws.secretkey=key2
You can change the endpoint with any port you defined while you run the DynamoDB instance.
Then we need to introduce these application properties to spring boot application via custom configuration as below.
package com.javatodev.api.config;

import com.amazonaws.auth.AWSCredentialsProvider;
import com.amazonaws.auth.AWSStaticCredentialsProvider;
import com.amazonaws.auth.BasicAWSCredentials;
import com.amazonaws.client.builder.AwsClientBuilder;
import com.amazonaws.services.dynamodbv2.AmazonDynamoDB;
import com.amazonaws.services.dynamodbv2.AmazonDynamoDBClientBuilder;

import org.socialsignin.spring.data.dynamodb.repository.config.EnableDynamoDBRepositories;
import org.springframework.beans.factory.annotation.Value;
import org.springframework.context.annotation.Bean;
import org.springframework.context.annotation.Configuration;

@Configuration
@EnableDynamoDBRepositories
    (basePackages = "com.javatodev.api.repository")
public class DynamoDBConfig {

    @Value("${amazon.dynamodb.endpoint}")
    private String amazonDynamoDBEndpoint;

    @Value("${amazon.aws.accesskey}")
    private String amazonAWSAccessKey;

    @Value("${amazon.aws.secretkey}")
    private String amazonAWSSecretKey;

    @Bean
    public AmazonDynamoDB amazonDynamoDB(AWSCredentialsProvider awsCredentialsProvider) {
        AmazonDynamoDB amazonDynamoDB
            = AmazonDynamoDBClientBuilder.standard()
            .withEndpointConfiguration(new AwsClientBuilder.EndpointConfiguration(amazonDynamoDBEndpoint, "us-west-2"))
            .withCredentials(awsCredentialsProvider).build();
        return amazonDynamoDB;
    }

    @Bean
    public AWSCredentialsProvider awsCredentialsProvider() {
        return new AWSStaticCredentialsProvider(new BasicAWSCredentials(amazonAWSAccessKey, amazonAWSSecretKey));
    }

}
@EnableDynamoDBRepositories – this will used to enable DynamoDB repositories, We just need to introduce the Spring Data repository base package here. Then DynamoDB repository capabilities will be added to our Spring data repositories.
new AwsClientBuilder.EndpointConfiguration(amazonDynamoDBEndpoint, "us-east-1")
Here I’ve set signingRegion as us-east-1, But it doesn’t make any change while we use local DynamoDB. This will be described when we connect with DynamoDB instance created on AWS console.
new BasicAWSCredentials(amazonAWSAccessKey, amazonAWSSecretKey)
Then the AWS credentials have added with key and secret, Also this is not have a value in local envornment, But it will be required while connecting with proper DynamoDB instance on AWS.
Ok now our application has capability of reading and writing to DynamoDB database. Let’s add DB table mappings, repositories and other stuff we need for our API.
Defining Model Classes
In spring boot we should add model classes with annotating table name when we dealing with DynamoDB.
@DynamoDBTable(tableName = "author")
So it will validate with the database and show any error if the table is missing.
com.amazonaws.services.dynamodbv2.model.ResourceNotFoundException: Cannot do operations on a non-existent table
Basically, DynamoDB will not create a collection like MongoDB does while running the application. Hence create the tables in the DynamoDB before start the Spring Boot application.
The author model will represent the author-related data set on the database. Here we only add simple parameters like firstName, lastName, and auto-generated String id for the author model.
package com.javatodev.api.model;

import com.amazonaws.services.dynamodbv2.datamodeling.DynamoDBAttribute;
import com.amazonaws.services.dynamodbv2.datamodeling.DynamoDBAutoGeneratedKey;
import com.amazonaws.services.dynamodbv2.datamodeling.DynamoDBHashKey;
import com.amazonaws.services.dynamodbv2.datamodeling.DynamoDBTable;

import lombok.Getter;
import lombok.Setter;

@Getter
@Setter
@DynamoDBTable(tableName = "author")
public class Author {

    @DynamoDBHashKey
    @DynamoDBAutoGeneratedKey
    private String id;

    @DynamoDBAttribute
    private String firstName;
    @DynamoDBAttribute
    private String lastName;

}
@DynamoDBHashKey – Annotation for marking a property as the hash key for a modeled class – This should be present in a Model POJO class. This can be applied via the getter method or class field.
@DynamoDBAutoGeneratedKey – Annotation for marking a hash key property in a class to auto-generate this key. Only String type is valid here.
package com.javatodev.api.model;

import com.amazonaws.services.dynamodbv2.datamodeling.DynamoDBAttribute;
import com.amazonaws.services.dynamodbv2.datamodeling.DynamoDBAutoGeneratedKey;
import com.amazonaws.services.dynamodbv2.datamodeling.DynamoDBHashKey;
import com.amazonaws.services.dynamodbv2.datamodeling.DynamoDBTable;

import lombok.Getter;
import lombok.Setter;

@Getter
@Setter
@DynamoDBTable(tableName = "book")
public class Book {

    @DynamoDBHashKey
    @DynamoDBAutoGeneratedKey
    private String id;

    @DynamoDBAttribute
    private String name;
    @DynamoDBAttribute
    private String isbn;
    @DynamoDBAttribute
    private String authorId;

}
Now we can store and manage any kind of book with its author data in DynamoDB, Now we need to add library members in order to lend the books.
Here I’m using a name and member status as parameters for library members. MemberStatus will be added using an enum.
package com.javatodev.api.model;

public enum MemberStatus {
    ACTIVE, DEACTIVATED
}
Here we need to introduce MemberStatus enum using @DynamoDBTypeConvertedEnum.
package com.javatodev.api.model;

import com.amazonaws.services.dynamodbv2.datamodeling.DynamoDBAttribute;
import com.amazonaws.services.dynamodbv2.datamodeling.DynamoDBAutoGeneratedKey;
import com.amazonaws.services.dynamodbv2.datamodeling.DynamoDBHashKey;
import com.amazonaws.services.dynamodbv2.datamodeling.DynamoDBTable;
import com.amazonaws.services.dynamodbv2.datamodeling.DynamoDBTypeConvertedEnum;

import lombok.Getter;
import lombok.Setter;

@Getter
@Setter
@DynamoDBTable(tableName = "member")
public class Member {

    @DynamoDBHashKey
    @DynamoDBAutoGeneratedKey
    private String id;

    @DynamoDBAttribute
    private String firstName;

    @DynamoDBAttribute
    private String lastName;

    @DynamoDBAttribute
    @DynamoDBTypeConvertedEnum
    private MemberStatus status;

}
Now we have authors, books and members ready. Let’s add Lend document to keep track on book lending inside our library.
Lend table will have status defined using an enum, lending startedDate, due date, book, and member as parameters,
package com.javatodev.api.model;

public enum LendStatus {
    AVAILABLE, BURROWED
}
package com.javatodev.api.model;

import com.amazonaws.services.dynamodbv2.datamodeling.DynamoDBAttribute;
import com.amazonaws.services.dynamodbv2.datamodeling.DynamoDBAutoGeneratedKey;
import com.amazonaws.services.dynamodbv2.datamodeling.DynamoDBHashKey;
import com.amazonaws.services.dynamodbv2.datamodeling.DynamoDBTable;
import com.amazonaws.services.dynamodbv2.datamodeling.DynamoDBTypeConvertedEnum;

import lombok.Getter;
import lombok.Setter;

@Getter
@Setter
@DynamoDBTable(tableName = "lend")
public class Lend {

    @DynamoDBHashKey
    @DynamoDBAutoGeneratedKey
    private String id;

    @DynamoDBAttribute
    @DynamoDBTypeConvertedEnum
    private LendStatus status;

    @DynamoDBAttribute
    private String startOn;

    @DynamoDBAttribute
    private String dueOn;

    @DynamoDBAttribute
    private String bookId;

    @DynamoDBAttribute
    private String memberId;

}
All good. Now we have defined all the models with relationships that we need to store our dataset inside this API.
Defining Repository Layer
Now our application has model classes to map our database with java. So our database access layer is missing one more additional component. That’s the repository layer. Let’s build the repository layer now.
Here I’ll use CrudRepository which allows us to build communication with the database easily. This CrudRepository is the same as JPARepository for the SQL-based database. It has multiple default implementations to support saveAll(), findById(), save() and more which coming with CrudRepository.
Here is the AuthorRepository which builds the database communication part for the Author table. Here We need to give the DynamoDBTable class name and Data type for the ID value as parameters for CrudRepository.
Here is the AuthorRepository which build the database communication part for Author table. Here We need to give Document class name and Data type for the ID value as parameters for CrudRepository.
package com.javatodev.api.repository;

import com.javatodev.api.model.Author;

import org.springframework.data.repository.CrudRepository;

public interface AuthorRepository extends CrudRepository<Author, String> {
}
All three other Entities like Book, Lend and Member should have Repositories like above, Additionally, there are few additional read methods we should add in a few repositories to support our service layer logic.
Here I’m returning java.util.Optional Entity after reading the entity by a parameter. So using Optional we could easily check is it available or not and many more.
package com.javatodev.api.repository;

import com.javatodev.api.model.Book;
import org.socialsignin.spring.data.dynamodb.repository.EnableScan;

import org.springframework.data.repository.CrudRepository;

import java.util.Optional;

@EnableScan
public interface BookRepository extends CrudRepository<Book, String> {
    Optional<Book> findByIsbn(String isbn);
}
package com.javatodev.api.repository;

import org.socialsignin.spring.data.dynamodb.repository.EnableScan;
import com.javatodev.api.model.Book;
import com.javatodev.api.model.Lend;
import com.javatodev.api.model.LendStatus;

import org.springframework.data.repository.CrudRepository;

import java.util.Optional;

@EnableScan
public interface LendRepository extends CrudRepository<Lend, String> {
    Optional<Lend> findByBookAndStatus(Book book, LendStatus status);
}
Now we have a full database access layer with mappings and repository layer. Let’s focus on the writing service layer.
Here we can use a repository layer directly from a controller. But as a standard keep in mind to access data with a service layer and process it there and return using a controller.
Adding Service Layer
We only have simple requirements around a simple library system, Hence full business logic could wrap around a single service, Let’s call it LibraryService.java. If you have any idea of having multiple services it’s up to you and free to use as you need.
Additionally I’m using few request classes to bring data from controller layer to service layer like below,
package com.javatodev.api.model.request;

import lombok.Data;

@Data
public class AuthorCreationRequest {
    private String firstName;
    private String lastName;
}
package com.javatodev.api.model.request;

import lombok.Data;

@Data
public class BookCreationRequest {
    private String name;
    private String isbn;
    private String authorId;
}
package com.javatodev.api.model.request;

import java.util.List;

import lombok.Data;

@Data
public class BookLendRequest {
    private List<String> bookIds;
    private String memberId;
}
package com.javatodev.api.model.request;

import lombok.Data;

@Data
public class MemberCreationRequest {
    private String firstName;
    private String lastName;
}
LibraryService.java
package com.javatodev.api.service;

import com.javatodev.api.exception.EntityNotFoundException;
import com.javatodev.api.model.*;
import com.javatodev.api.model.request.AuthorCreationRequest;
import com.javatodev.api.model.request.BookCreationRequest;
import com.javatodev.api.model.request.BookLendRequest;
import com.javatodev.api.model.request.MemberCreationRequest;
import com.javatodev.api.repository.AuthorRepository;
import com.javatodev.api.repository.BookRepository;
import com.javatodev.api.repository.LendRepository;
import com.javatodev.api.repository.MemberRepository;

import org.springframework.beans.BeanUtils;
import org.springframework.stereotype.Service;

import java.time.Instant;
import java.time.temporal.ChronoUnit;
import java.util.ArrayList;
import java.util.List;
import java.util.Optional;

import lombok.RequiredArgsConstructor;

@Service
@RequiredArgsConstructor
public class LibraryService {

    private final AuthorRepository authorRepository;
    private final MemberRepository memberRepository;
    private final LendRepository lendRepository;
    private final BookRepository bookRepository;

    public Book readBookById(String id) {
        Optional<Book> book = bookRepository.findById(id);
        if (book.isPresent()) {
            return book.get();
        }
        throw new EntityNotFoundException("Cant find any book under given ID");
    }
    public Iterable<Book> readBooks() {
        return bookRepository.findAll();
    }
    public Book readBook(String isbn) {
        Optional<Book> book = bookRepository.findByIsbn(isbn);
        if (book.isPresent()) {
            return book.get();
        }
        throw new EntityNotFoundException("Cant find any book under given ISBN");
    }
    public Book createBook(BookCreationRequest book) {
        Optional<Author> author = authorRepository.findById(book.getAuthorId());
        if (!author.isPresent()) {
            throw new EntityNotFoundException("Author Not Found");
        }
        Book bookToCreate = new Book();
        BeanUtils.copyProperties(book, bookToCreate);
        bookToCreate.setAuthorId(author.get().getId());
        return bookRepository.save(bookToCreate);
    }
    public void deleteBook(String id) {
        bookRepository.deleteById(id);
    }
    public Member createMember(MemberCreationRequest request) {
        Member member = new Member();
        BeanUtils.copyProperties(request, member);
        member.setStatus(MemberStatus.ACTIVE);
        return memberRepository.save(member);
    }
    public Member updateMember (String id, MemberCreationRequest request) {
        Optional<Member> optionalMember = memberRepository.findById(id);
        if (!optionalMember.isPresent()) {
            throw new EntityNotFoundException("Member not present in the database");
        }
        Member member = optionalMember.get();
        member.setLastName(request.getLastName());
        member.setFirstName(request.getFirstName());
        return memberRepository.save(member);
    }
    public Author createAuthor (AuthorCreationRequest request) {
        Author author = new Author();
        BeanUtils.copyProperties(request, author);
        return authorRepository.save(author);
    }
    public List<String> lendABook (BookLendRequest request) {
        Optional<Member> memberForId = memberRepository.findById(request.getMemberId());
        if (!memberForId.isPresent()) {
            throw new EntityNotFoundException("Member not present in the database");
        }
        Member member = memberForId.get();
        if (member.getStatus() != MemberStatus.ACTIVE) {
            throw new RuntimeException("User is not active to proceed a lending.");
        }
        List<String> booksApprovedToBurrow = new ArrayList<>();
        request.getBookIds().forEach(bookId -> {
            Optional<Book> bookForId = bookRepository.findById(bookId);
            if (!bookForId.isPresent()) {
                throw new EntityNotFoundException("Cant find any book under given ID");
            }
            Optional<Lend> burrowedBook = lendRepository.findByBookAndStatus(bookForId.get(), LendStatus.BURROWED);
            if (!burrowedBook.isPresent()) {
                booksApprovedToBurrow.add(bookForId.get().getName());
                Lend lend = new Lend();
                lend.setMemberId(memberForId.get().getId());
                lend.setBookId(bookForId.get().getId());
                lend.setStatus(LendStatus.BURROWED);
                lend.setStartOn(Instant.now().toString());
                lend.setDueOn(Instant.now().plus(30, ChronoUnit.DAYS).toString());
                lendRepository.save(lend);
            }
        });
        return booksApprovedToBurrow;
    }

}
Additionally, I’ve created a custom exception to throw if there is no data found for given instructions from the database. If you need to check how we can implement custom exceptions and handle the inside spring boot, check out our article on Exception Handling Spring Boot REST API.
Method definitions are as follows.
- readBookById(String id) – This method will read Book using given String ID. and Here I’ve used java.util.Optional to easily check availability after reading any data. This will return a Runtime exception if there is no data present for the given ID.
- readBooks() – Read all books stored in the database.
- createBook(BookCreationRequest book) – This method will bring data from the controller using BookCreationRequest and store those data in the database and return created book after successfully completed.
- deleteBook(String id) – Deletes a book by a given ID.
- createMember(MemberCreationRequest request) – This creates a member using membercreationrequest.
- updateMember (String id, MemberCreationRequest request) – Update the first name and last name of a member under a given ID.
- createAuthor (AuthorCreationRequest request) – Create an author using given author properties.
- lendABook (BookLendRequest request) – Create book lending on after reading book and member. Additionally, this allows lending multiple books for a single member. Additionally this stores
Now we are ready with our business logic with separate service layer. Let’s add the Rest Controllers to expose these methods as a REST API.
Controller Layer to Expose REST API Endpoints
Here we need to have multiple endpoints to support different aspects. Additionally ‘/api/library‘ is common for every endpoint which defined in this API contract.
Let’s start with adding a controller with @RequestMapping to ‘/api/library’,
package com.javatodev.api.controller;

import com.javatodev.api.model.Author;
import com.javatodev.api.model.Book;
import com.javatodev.api.model.Member;
import com.javatodev.api.model.request.AuthorCreationRequest;
import com.javatodev.api.model.request.BookCreationRequest;
import com.javatodev.api.model.request.BookLendRequest;
import com.javatodev.api.model.request.MemberCreationRequest;
import com.javatodev.api.service.LibraryService;

import org.springframework.http.ResponseEntity;
import org.springframework.web.bind.annotation.*;

import java.util.List;

import lombok.RequiredArgsConstructor;

@RestController
@RequestMapping(value = "/api/library")
@RequiredArgsConstructor
public class LibraryController {
    private final LibraryService libraryService;
}
So every and each endpoint we define inside this rest controller will have ‘/api/library’ as the prefix for the API URL and I’ll use @RequiredArgsConstructor from lombok to inject LibraryService into this controller.
Here as a standard we are not calling any repository directly from controller, every and each request is going through a service and coming back through the service too.
GET mapping for book findAll and find using ISBN will cover this endpoint. Here I’m using @RequestParam and it should be passed through the URL, and It’s an optional value. we can use @RequestParam to get optional parameters like this in Spring Boot REST API. Additionally, I’m using ResponseEntity without passing a type, hence I could return both List
@GetMapping("/book")
    public ResponseEntity readBooks(@RequestParam(required = false) String isbn) {
        if (isbn == null) {
            return ResponseEntity.ok(libraryService.readBooks());
        }
        return ResponseEntity.ok(libraryService.readBook(isbn));
    }
GET mapping to read a book by ID. The ID is passing as a path variable, hence the URL will add the ID in the end, be careful to add the same name in both URL and the variable you are going to use a path variable here.
@GetMapping("/book/{bookId}")
    public ResponseEntity<Book> readBook (@PathVariable String bookId) {
        return ResponseEntity.ok(libraryService.readBookById(bookId));
    }
POST mapping for creating a book. In this endpoint the API accepts a request body, so always it’s defined as an application/json by default in spring boot.
@PostMapping("/book")
    public ResponseEntity<Book> createBook (@RequestBody BookCreationRequest request) {
        return ResponseEntity.ok(libraryService.createBook(request));
    }
DELETE API for delete book by ID. Here same as read by ID we can pass an identification to identify correct value from DB to DELETE.
@DeleteMapping("/book/{bookId}")
    public ResponseEntity<Void> deleteBook (@PathVariable String bookId) {
        libraryService.deleteBook(bookId);
        return ResponseEntity.ok().build();
    }
POST API for create a member
@PostMapping("/member")
    public ResponseEntity<Member> createMember (@RequestBody MemberCreationRequest request) {
        return ResponseEntity.ok(libraryService.createMember(request));
    }
PATCH mapping for update created member. Here we need to have both member id and update request, So we can pass the ID through URL and the updates through the body.
@PatchMapping("/member/{memberId}")
    public ResponseEntity<Member> updateMember (@RequestBody MemberCreationRequest request, @PathVariable String memberId) {
        return ResponseEntity.ok(libraryService.updateMember(memberId, request));
    }
POST API to do a lending for a book.
@PostMapping("/book/lend")
    public ResponseEntity<List<String>> lendABook(@RequestBody BookLendRequest bookLendRequests) {
        return ResponseEntity.ok(libraryService.lendABook(bookLendRequests));
    }
POST API to create author.
@PostMapping("/book")
    public ResponseEntity<Book> createBook (@RequestBody BookCreationRequest request) {
        return ResponseEntity.ok(libraryService.createBook(request));
    }
Final project structure,
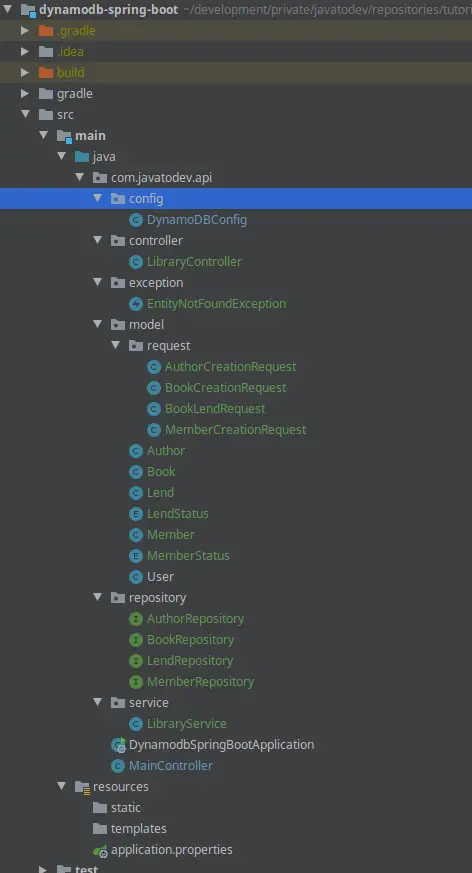
final-project-structure-spring-boot-dynamodb.png
Now we are ready with API. Let’s go forward with testing the API.
Testing API
Here I’m using Postman to test our API built using MongoDB and Spring Boot. Additionally, You can access the following postman collection by just pressing the following button on your browser. Use JAVA_TO_DEV -> DYNAMO_DB Collection to test this API.
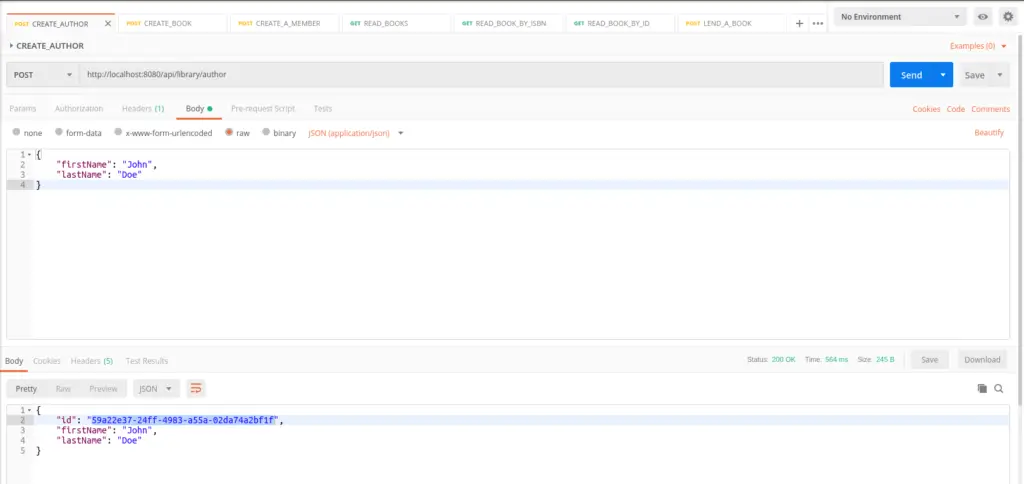
Creating author API – Spring Boot DynamoDB CRUD API
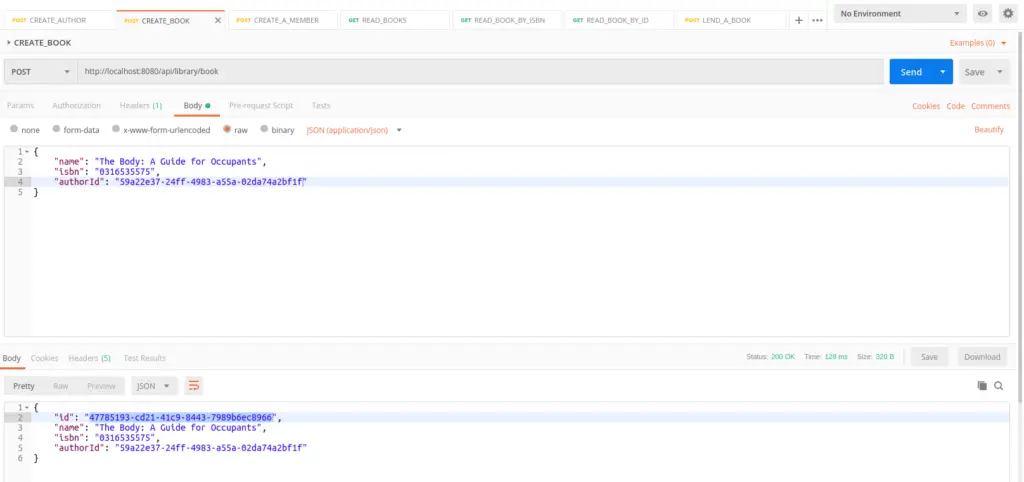
Creating Book API – Spring Boot DynamoDB CRUD API
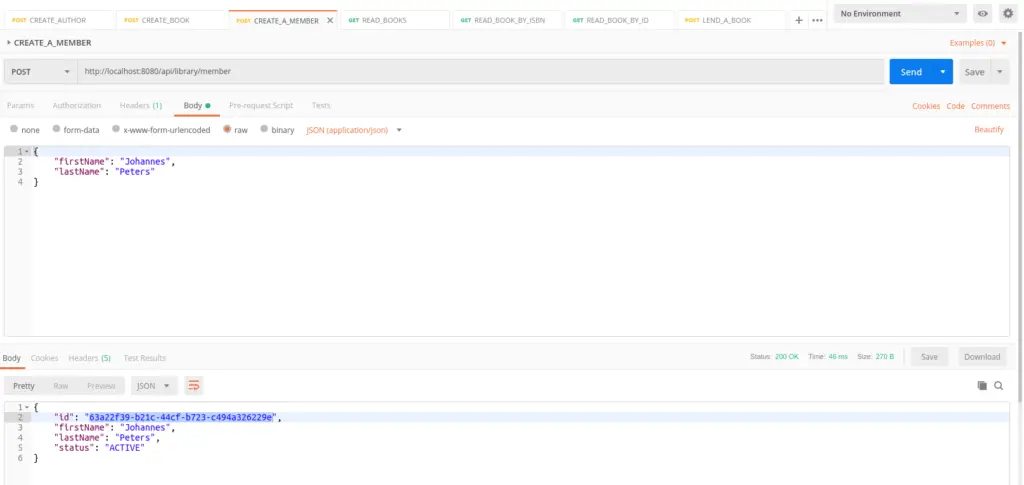
Creating Member API – Spring Boot DynamoDB CRUD API
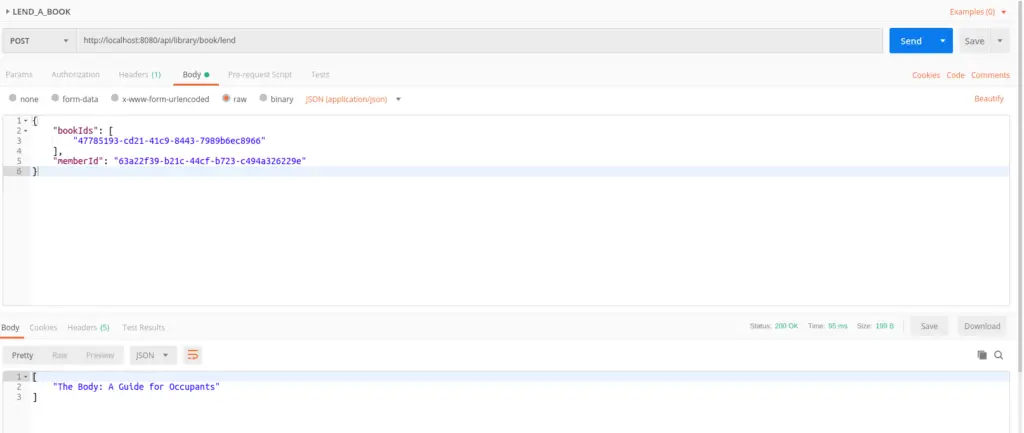
Lend a Book API – Spring Boot DynamoDB CRUD API
Setup DynamoDB Tables in AWS Console
Now we have created a DynamoDB instance locally and developed an API to access the database using spring boot. Let’s see how we can move to AWS console and create DynamoDB table structure for our app then accessing it via Spring Boot.
First, go to the DynamoDB dashboard from the AWS console. and click the Create Table button.
DynamoDB DB Dashboard AWS Console
Then insert the table name and id parameter name in the next window. Spring Boot will create other parameters in your java POJO class for that DynamoDBTable while running.
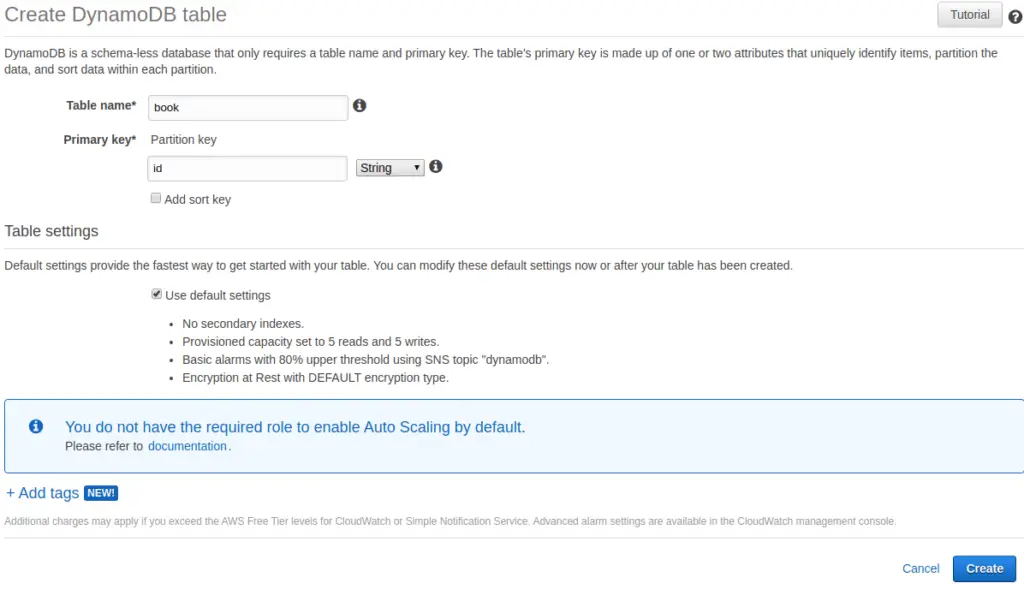
Create DynamoDB Table AWS console
Now all the required tables have created inside AWS console.

table set created for tutorial in AWS console
Now our table structure is added correctly. Now we shoudl focus on accessing those tables via Spring Boot application.
First we should create a IAM user to access the DynamoDB table structure.
First, go to IAM Management Console in AWS and Add User. Here we just need to access DynamoDB programmatically using an access key and secret access key. Just create a user with username preferred and Access Type: Programmatic Access.
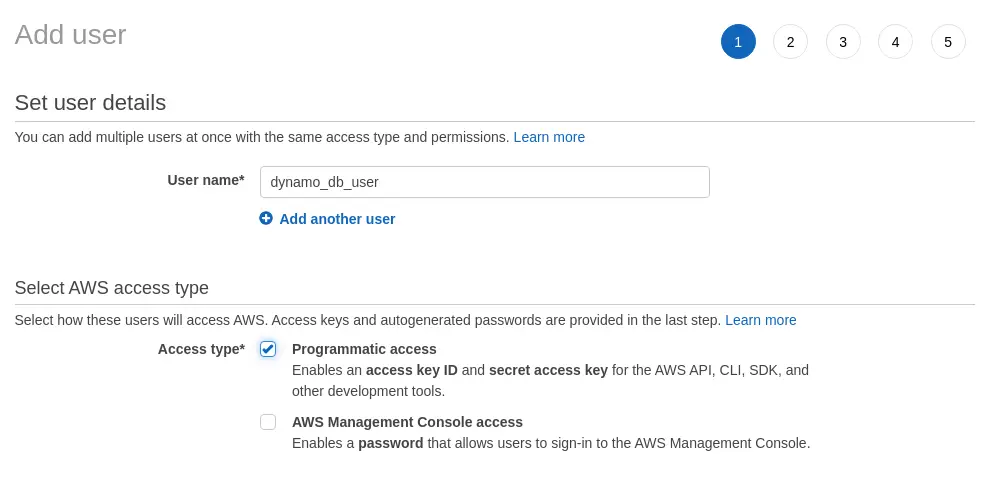
Add user with Programmatic Access
Then We should add permissions to access DynamoDB to this specific user. We can do that by adding a new user group if there is no anyone. For the moment I’m creating a user group with DynamoDBFullAcess for this tutorial.
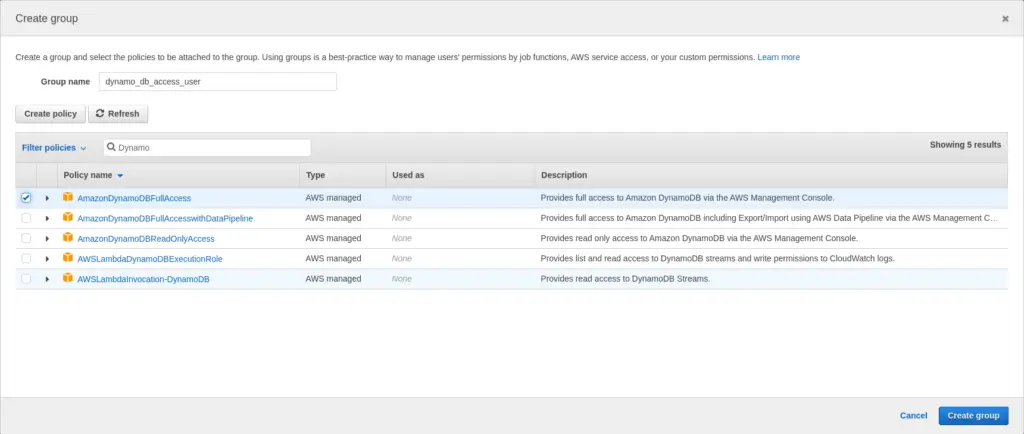
Create user group with DynamoDB access permission
and then select the newly created usergroup for your user.
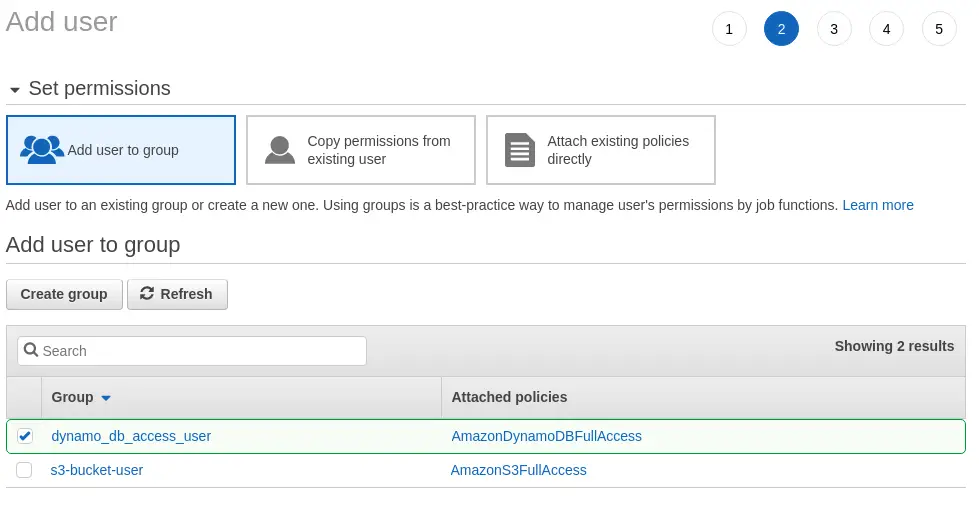
Set user group for the IAM user
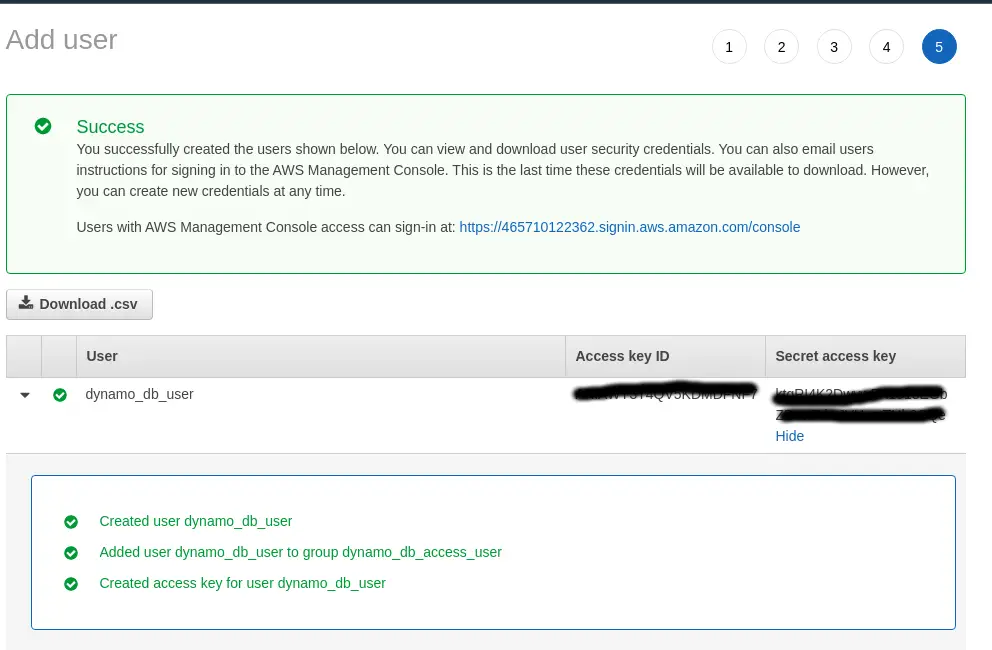
Then add tags in the next window if you need and create a user from the 4th window. Then you can download Access Key ID and Secret access key for newly created users. or else both values will be visible to you in last window.
Then change your spring boot application.properties with correct DynamoDB URL , accesskey and secret key.
amazon.dynamodb.endpoint=https://dynamodb.us-west-2.amazonaws.com
amazon.aws.accesskey=<access_key_here>
amazon.aws.secretkey=<secret_key>
In here keep in mind to use correct region for your url and DynamoDBConfig.
Conclusion
All done, Now I hope you have a good understanding of how to use DynamoDB based database with Spring Boot REST API development. Comment your ideas or issues you are facing while developing your Spring boot API.
You can find source codes for this tutorial from our Github.