How To Use ActiveMQ With Spring Boot REST API
-
 Lakshitha Warnakulasuriya
 - 25 Nov, 2023
Spring Boot is a powerful framework that simplifies the development of Java applications, providing a convention-over-configuration approach and reducing boilerplate code. When combined with ActiveMQ, a popular open-source message broker, it enables robust and scalable messaging capabilities within your Spring Boot applications.
Key Components of ActiveMQ:
-
Message Broker: ActiveMQ serves as a message-oriented middleware, facilitating communication between various components of a distributed system through messaging.
-
JMS (Java Message Service): ActiveMQ adheres to the JMS standard, providing a reliable and standardized way for Java applications to produce and consume messages.
-
Queue and Topic Support: It supports both queues for point-to-point communication and topics for publish-subscribe models, allowing developers to choose the messaging paradigm that suits their application’s needs.
Combining Spring Boot with ActiveMQ provides a streamlined and efficient way to implement messaging in Java applications. It simplifies configuration, enhances scalability and reliability, and supports diverse messaging patterns, making it an ideal choice for building robust and responsive distributed systems. For more information, follow the ActiveMQ Documentation. Here is the simple architecture of ActiveMQ.
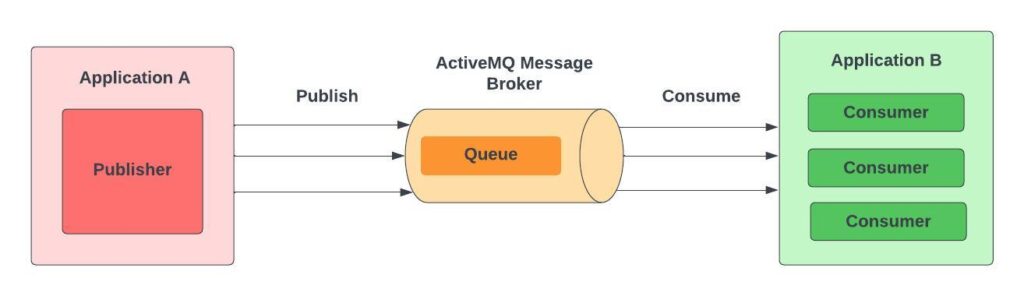
Simple Architecture of ActiveMQ
Optional Step : How to setup ActiveMQ in local
- Install Docker. Follow the Docker Documentation for download and install docker.
- Pull ActiveMQ docker image from the Docker Hub.
- Run the docker image of ActiveMQ and start the container.
docker run -p 61616:61616 -p 8161:8161 rmohr/activemq

Running Docker Container of ActiveMQ
After run the ActiveMQ through Docker, we can access the AvtiveMQ console using http://localhost:8161. Default username and password for the console is admin.

ActiveMQ Console
Adding Required Dependancies
I used Spring Initializer for generate the spring-boot project with ActiveMQ. If you are really new to Spring Boot, Please follow our article on How to Create a Spring Boot Project.
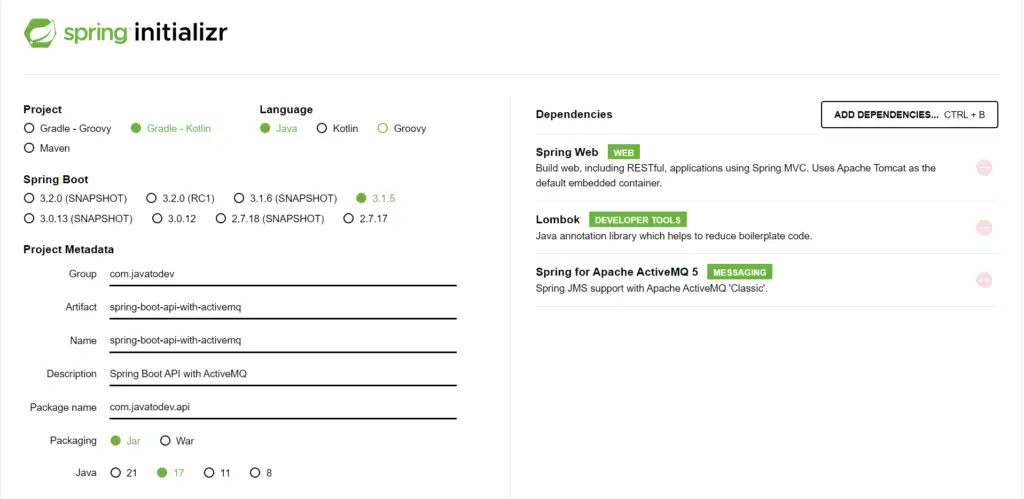
Setup Spring Boot Project with ActiveMQ using Spring Initializer
From build.gradle file, you can see all the dependencies which are downloaded for run the spring boot API with ACtiveMQ.
plugins {
	java
	id("org.springframework.boot") version "3.1.5"
	id("io.spring.dependency-management") version "1.1.3"
}

group = "com.javatodev"
version = "0.0.1-SNAPSHOT"

java {
	sourceCompatibility = JavaVersion.VERSION_17
}

configurations {
	compileOnly {
		extendsFrom(configurations.annotationProcessor.get())
	}
}

repositories {
	mavenCentral()
}

dependencies {
	implementation("org.springframework.boot:spring-boot-starter-activemq")
	implementation("org.springframework.boot:spring-boot-starter-web")
	compileOnly("org.projectlombok:lombok")
	annotationProcessor("org.projectlombok:lombok")
	testImplementation("org.springframework.boot:spring-boot-starter-test")
}

tasks.withType<Test> {
	useJUnitPlatform()
}
Let’s Start
There are two approaches to incorporating a messaging service into an application. One method involves transferring messages using an in-memory ActiveMQ instance. Alternatively, achieving the same functionality is possible by utilizing an externally launched ActiveMQ instance. This becomes crucial when the application needs to establish connections with a specific instance, specifying the host and port of the ActiveMQ server. In this article, we’ll delve into the process of implementing a basic messaging application using a standalone ActiveMQ instance.
Think we have a online store with computers and accessories. For the inventory management, we use ActiveMQ and facilitates real-time updates on product availability. From this tutorial I’m planning to enqueue and dequeue store related details from ActiveMQ.
Configure Application Properties
In application.properties or application.yml file, we define the properties which are need for the API. In hear we define activemq user, password and broker url. activemq.destination is the queue name which is create in ActiveMQ.
spring.activemq.broker-url=tcp://localhost:61616
spring.activemq.user=admin
spring.activemq.password=admin

activemq.destination=store
You can change the server port with defining it in the property file.
Then we need to introduce these application properties to spring boot application via ActiveMQ configuration class as below.
package com.javatodev.api.configuration;

import jakarta.jms.ConnectionFactory;
import org.springframework.boot.autoconfigure.jms.DefaultJmsListenerContainerFactoryConfigurer;
import org.springframework.context.annotation.Bean;
import org.springframework.context.annotation.Configuration;
import org.springframework.jms.annotation.EnableJms;
import org.springframework.jms.config.DefaultJmsListenerContainerFactory;
import org.springframework.jms.config.JmsListenerContainerFactory;
import org.springframework.jms.support.converter.MappingJackson2MessageConverter;
import org.springframework.jms.support.converter.MessageConverter;
import org.springframework.jms.support.converter.MessageType;

@Configuration
@EnableJms
public class JmsConfiguration {

    /**
     * Create JMS Connection Factory
     * @param connectionFactory
     * @param configurer
     * @return Connection Factory
     */
    @Bean
    public JmsListenerContainerFactory<?> jmsFactory(ConnectionFactory connectionFactory,
                                                     DefaultJmsListenerContainerFactoryConfigurer configurer) {
        DefaultJmsListenerContainerFactory factory = new DefaultJmsListenerContainerFactory();
        factory.setMessageConverter(jacksonJmsMessageConverter());
        configurer.configure(factory, connectionFactory);
        return factory;
    }

    /**
     * Serialize message content to json using TextMessage
     *
     * @return Message Converter
     */
    @Bean
    public MessageConverter jacksonJmsMessageConverter() {
        MappingJackson2MessageConverter converter = new MappingJackson2MessageConverter();
        converter.setTargetType(MessageType.TEXT);
        converter.setTypeIdPropertyName("_asb_");
        return converter;
    }

}
In here, we use bean for bind the connection between the ActiveMQ instance and API. Message Converter bean is used for convert the consume message with readable format.
Create Producer Class with Message
Before create the producer class, we need to define Store DTO class.
package com.javatodev.api.dto;

import lombok.Getter;
import lombok.Setter;
import lombok.ToString;

@Getter
@Setter
@ToString
public class Store{

    private int itemId;
    private String itemName;
    private int itemQuantity;
}
In procedure class we implement producer for publish the message to the queue.
package com.javatodev.api.producer;

import com.javatodev.api.dto.Store;
import lombok.extern.slf4j.Slf4j;
import org.springframework.beans.factory.annotation.Autowired;
import org.springframework.jms.core.JmsTemplate;
import org.springframework.stereotype.Component;

@Component
@Slf4j
public class StoreMessageProducer {

    @Autowired
    private JmsTemplate jmsTemplate;

    /**
     * Convert and publish the message to the queue
     *
     * @param destination
     * @param store
     */
    public void sendTo(String destination, Store store) {
        jmsTemplate.convertAndSend(destination, store);
        log.info("Producer> Message Sent");
    }

}
Create Controller Class
Then we need to define the controller class to route the ActiveMQ producers for publish the messages to queue.
There is POST method for publish Json message to the queue.
package com.javatodev.api.controller;

import com.javatodev.api.dto.Store;
import com.javatodev.api.producer.StoreMessageProducer;
import org.springframework.beans.factory.annotation.Autowired;
import org.springframework.beans.factory.annotation.Value;
import org.springframework.jms.core.JmsTemplate;
import org.springframework.web.bind.annotation.PostMapping;
import org.springframework.web.bind.annotation.RequestBody;
import org.springframework.web.bind.annotation.RequestMapping;
import org.springframework.web.bind.annotation.RestController;

@RestController
@RequestMapping("/api/v1")
public class StoreMessageController {

    @Autowired
    private JmsTemplate jmsTemplate;

    @Autowired
    StoreMessageProducer storeMessageProducer;

    @Value("${activemq.destination}")
    private String destination;

    /**
     * API for publish message for ActiveMQ queue
     * @param store
     * @return String
     */
    @PostMapping("/publish")
    public String publishMessage(@RequestBody Store store){
        storeMessageProducer.sendTo(destination,store);
        return "Success";
    }
}
Deploying and Testing the API with Publisher
When we build and start our API, we can see the binding with our API and ActiveMQ in console. Also we can see the queues which are registered with ActiveMQ.

Queue is Registered with ActiveMQ

Connection Between API and ActiveMQ
Publish the Message
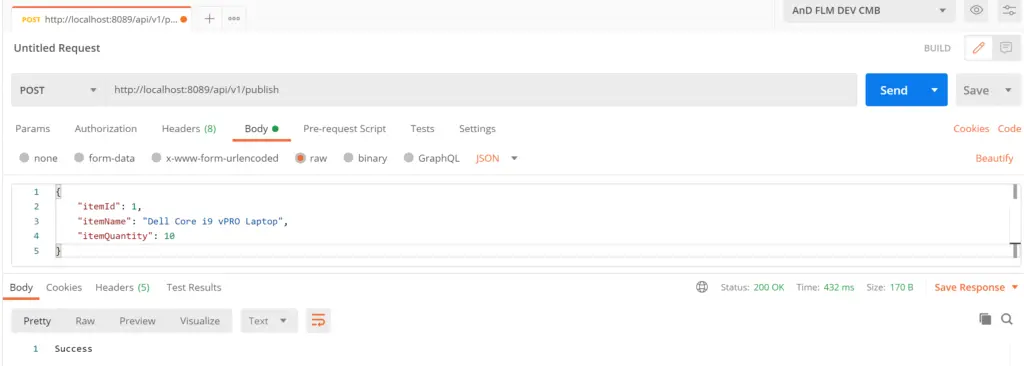
We can publish a message to the define destination queue from below mentioned POST URL.
http://<IP:PORT>/api/v1/publish
Once we publish the message from postman, we can see the response, log message from console and we can see number of pending messages and enqueue messages count is 1 in the ActiveMQ console.
Postmen Request and Response
[nio-8089-exec-2] c.j.api.producer.StoreMessageProducer : Producer> Message Sent

Enqueue Message in ActiveMQ
Updating the API with Adding Consumer
For consume the message from ActiveMQ, we used separate consumer classes for consume message. We used same properties which are configured in application.properties file. We can use the @JmsListener annotation for mentioned the method is a JMS Listener with destination and container factory.
package com.javatodev.api.consumer;

import com.javatodev.api.dto.Store;
import lombok.extern.slf4j.Slf4j;
import org.springframework.jms.annotation.JmsListener;
import org.springframework.stereotype.Component;

@Slf4j
@Component
public class StoreMessageConsumer {

    /**
     * Message Listener of ActiveMQ queue
     * @param store
     */
    @JmsListener(destination = "${activemq.destination}", containerFactory = "jmsFactory")
    public void processToDo(Store store) {
        log.info("Consumer> " + store);
    }
}
Deploying and Testing the API with Consumer
We can publish a message to the define destination queue from below mentioned POST URL.
http://<IP:PORT>/api/v1/publish
Once we publish the message from postman, we can see the response, log messages for both publish and consume from console and we can see number messages enqueue and dequeue in the ActiveMQ console.
Postmen Request and Response
[nio-8089-exec-1] c.j.api.producer.StoreMessageProducer    : Producer> Message Sent
[ntContainer#0-1] c.j.api.consumer.StoreMessageConsumer    : Consumer> Store(itemId=1, itemName=Dell Core i9 vPRO Laptop, itemQuantity=10)

Enqueue and Dequeue Messages
Conclusion
Thanks for reading our latest article on Spring Boot REST API with ActiveMQ with practical usage.
If you are looking for spring boot practical application development tutorials, just check our article series.
You can get the source code for this tutorial from our GitHub repository.