As more organizations migrate their infrastructure to the cloud, the need for resilient and secure Virtual Private Cloud (VPC) networks becomes more important. AWS offers a powerful VPC service that allows users to create their own virtual network in the cloud.
However, setting up and managing a VPC can be difficult and time-consuming. That’s where Terraform comes in as an open-source infrastructure as a code tool that can help automate creating and managing AWS resources.
In this article, we’ll explore how to use Terraform to create a VPC on AWS, including the various components that make up a VPC and the steps required to implement them. By the end of this article, you’ll know exactly how to use Terraform to build your own secure and scalable VPC network on AWS.
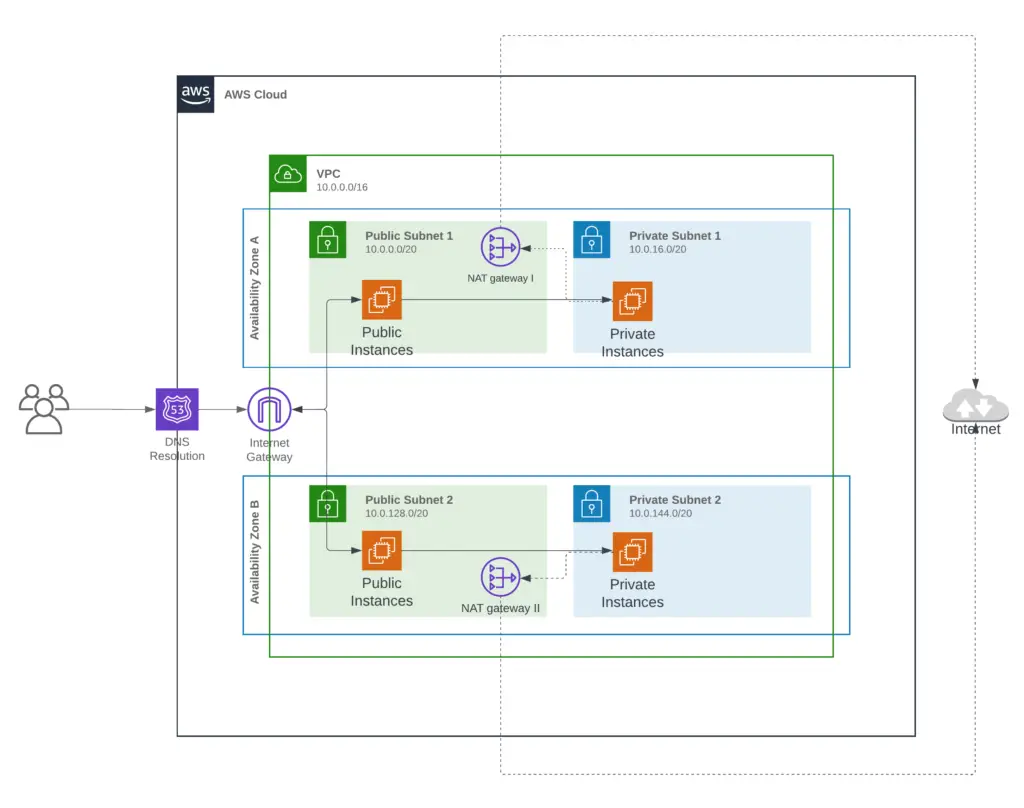
The architecture we are going to setup
This setup includes the following components within the VPC that we will set up using Terraform.
- AWC VPC – Base Virtual Private Cloud that creates in the AWS.
- Subnets – Includes private and public subnets within 2 availability zones. (Here I’ve used 2 availability zones, but feel free to add more AZs per your requirement.)
- Internet Gateway – will allow instances under the public subnet to access the public internet and users to access things on the public subnet via the internet.
- NAT Gateway – will allow instances under private subnet to access public internet when there is any requirement like download patches, os updates, etc. But when using a NAT gateway it allows only one-way communication that will not open private subnet to the public internet.
- Security Groups – Security groups will be used in allowing who can access what inside this architecture
- Route tables – used to build the routing for IGW and NAT gateway.
Prerequisites
To follow this tutorial you will need:
- The Terraform CLI (1.2.0+) installed.
- The AWS CLI is installed.
- AWS account and associated credentials that allow you to create resources.
Let’s focus on building the VPC now.
Initiate Terraform Configuration
First, we need to initiate the terraform folder where we can keep all the configurations related to our terraform setup.
$ mkdir terraform-configuration
$ cd terraform-configuration
create main.tf and copy the following content where we define providers to the terraform.
terraform {
  required_providers {
    aws = {
      source  = "hashicorp/aws"
      version = "~> 4.16"
    }
  }

  required_version = ">= 1.2.0"
}
Then run the following command to initiate terraform in this directory.
$ terraform init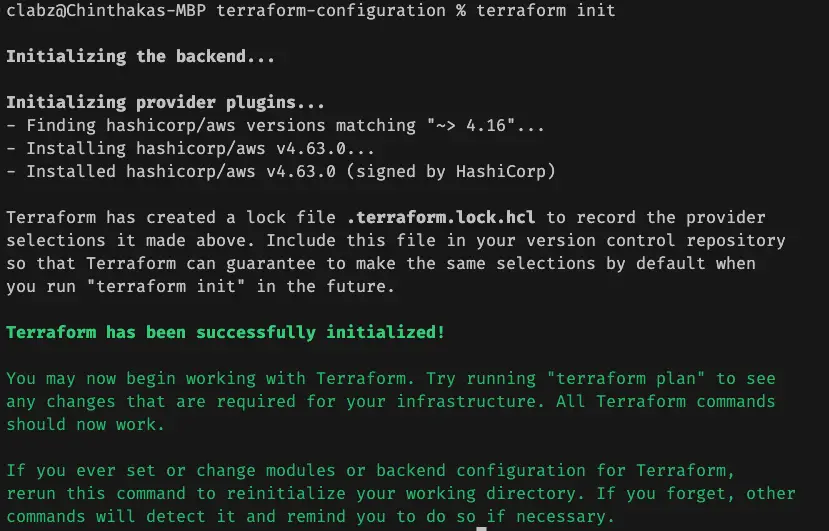
Basic Terraform Commands
We have the ability to validate the config before applying it on a real AWS environment using Terraform Validate.
$ terraform validate
Additionally, we can plan the configuration before applying it on a real AWS environment using Terraform plan, Which shows what we are going to publish and the changes that going to apply on the AWS.
$ terraform plan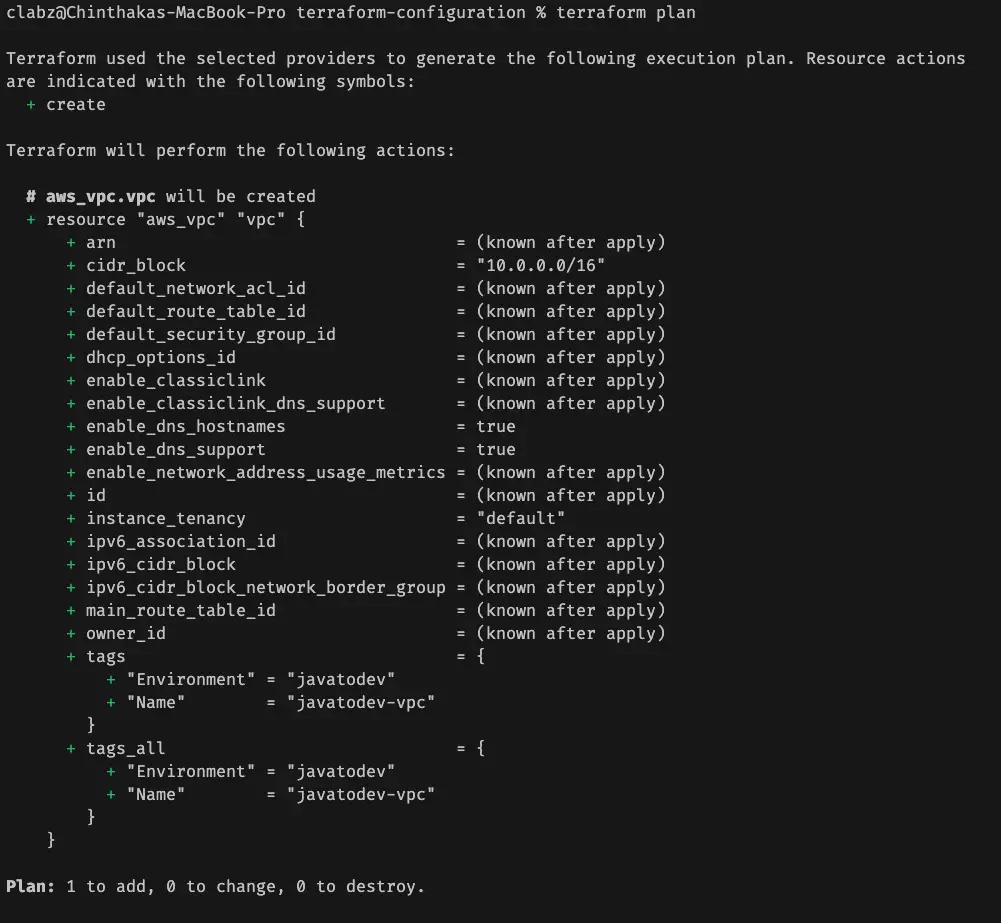
Also we can format the terraform configuration document using following command,
$ terraform fmtDefine input variables for Terraform
Terraform configurations can include variables to make our configuration more dynamic and flexible rather than hard code those whenever needed.
let’s create the vars.tf where we can manage all the variables to the configuration that we are going to build.
variable "aws_region" {
  default = "us-east-1"
}

variable "environment" {
  default = "javatodev"
}

variable "vpc_cidr" {
  default     = "10.0.0.0/16"
  description = "CIDR block of the vpc"
}

variable "public_subnets_cidr" {
  type        = list(any)
  default     = ["10.0.0.0/20", "10.0.128.0/20"]
  description = "CIDR block for Public Subnet"
}

variable "private_subnets_cidr" {
  type        = list(any)
  default     = ["10.0.16.0/20", "10.0.144.0/20"]
  description = "CIDR block for Private Subnet"
}
Define provider with an AWS region
Here we have to use the AWS provider with setting AWS region where we should publish this configuration and build the architecture.
Additionally, here we are referring to variables we have defined in the earlier stage as well.
provider "aws" {
  region = var.aws_region
}
Local Values
A local value assigns a name to an expression, so you can use the name multiple times within a module instead of repeating the expression.
Local values are like a function’s temporary local variables in programming languages.
Now we need to set the following availability zones in this setup.
- us-east-1a
- us-east-1b
we set availability zones in this setup as a local value as follows, and refer to those when needed within other instructions.
locals {
  availability_zones = ["${var.aws_region}a", "${var.aws_region}b"]
}
Define VPC and other components
VPC – Virtual Private Network
Now we can start defining the VPC and related components inside the necessary architecture.
Let’s begin with instructions on VPC creation.
# VPC
resource "aws_vpc" "vpc" {
cidr_block = var.vpc_cidr
enable_dns_hostnames = true
enable_dns_support = true
tags = {
Name = "${var.environment}-vpc"
Environment = var.environment
}
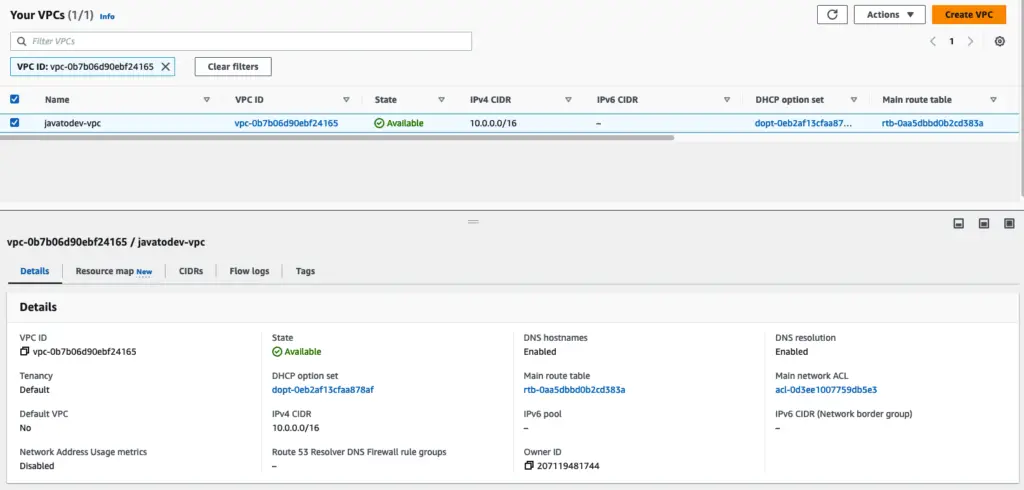
}Now we have a resource that we can create on AWS with Terraform, Let’s apply this VPC and check with the AWS VPC dashboard on that specific region.
$ terraform apply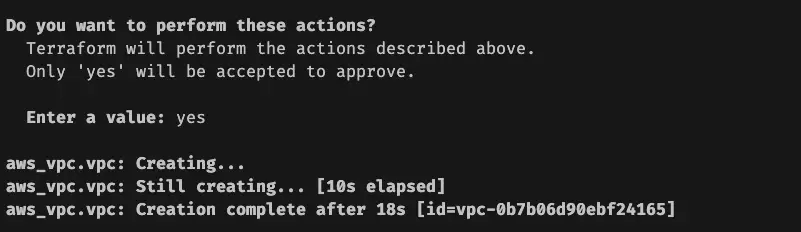
Private and Public Subnets Inside VPC
Let’s configure the private and public subnets that we are going to place inside this VPC.
# Public subnet
resource "aws_subnet" "public_subnet" {
  vpc_id                  = aws_vpc.vpc.id
  count                   = length(var.public_subnets_cidr)
  cidr_block              = element(var.public_subnets_cidr, count.index)
  availability_zone       = element(local.availability_zones, count.index)
  map_public_ip_on_launch = true

  tags = {
    Name        = "${var.environment}-${element(local.availability_zones, count.index)}-public-subnet"
    Environment = "${var.environment}"
  }
}

# Private Subnet
resource "aws_subnet" "private_subnet" {
  vpc_id                  = aws_vpc.vpc.id
  count                   = length(var.private_subnets_cidr)
  cidr_block              = element(var.private_subnets_cidr, count.index)
  availability_zone       = element(local.availability_zones, count.index)
  map_public_ip_on_launch = false

  tags = {
    Name        = "${var.environment}-${element(local.availability_zones, count.index)}-private-subnet"
    Environment = "${var.environment}"
  }
}
Internet Gateway and NAT Gateway
Internet gateway allows connecting the VPC to the Internet and to other AWS services through public internet.
NAT gateway that instances in a private subnet can connect to services outside your VPC but external services cannot initiate a connection with those instances.
#Internet gateway
resource "aws_internet_gateway" "ig" {
  vpc_id = aws_vpc.vpc.id
  tags = {
    "Name"        = "${var.environment}-igw"
    "Environment" = var.environment
  }
}

# Elastic-IP (eip) for NAT
resource "aws_eip" "nat_eip" {
  vpc        = true
  depends_on = [aws_internet_gateway.ig]
}

# NAT Gateway
resource "aws_nat_gateway" "nat" {
  allocation_id = aws_eip.nat_eip.id
  subnet_id     = element(aws_subnet.public_subnet.*.id, 0)
  tags = {
    Name        = "nat-gateway-${var.environment}"
    Environment = "${var.environment}"
  }
}
As per the standard, we should have a NAT gateway on each AZ to access the internet without any issue in a situation like an unhealthy availability zone.
But here we are only creating a single NAT gateway with single elastic IP for the demo purposes.
Route tables – private and public subnets
# Routing tables to route traffic for Private Subnet
resource "aws_route_table" "private" {
  vpc_id = aws_vpc.vpc.id
  tags = {
    Name        = "${var.environment}-private-route-table"
    Environment = "${var.environment}"
  }
}

# Routing tables to route traffic for Public Subnet
resource "aws_route_table" "public" {
  vpc_id = aws_vpc.vpc.id

  tags = {
    Name        = "${var.environment}-public-route-table"
    Environment = "${var.environment}"
  }
}
Configure public route to use internet gateway for internet access
# Route for Internet Gateway
resource "aws_route" "public_internet_gateway" {
  route_table_id         = aws_route_table.public.id
  destination_cidr_block = "0.0.0.0/0"
  gateway_id             = aws_internet_gateway.ig.id
}
Configure private route to use a NAT gateway for internet access
# Route for NAT Gateway
resource "aws_route" "private_internet_gateway" {
  route_table_id         = aws_route_table.private.id
  destination_cidr_block = "0.0.0.0/0"
  gateway_id             = aws_nat_gateway.nat.id
}
Associate route tables for subnets
Now we have subnets, route tables, and route table access to the internet, Now we can associate these route tables into the correct subnets.
route table for public subnets.
# Route table associations for both Public subnet
resource "aws_route_table_association" "public" {
  count          = length(var.public_subnets_cidr)
  subnet_id      = element(aws_subnet.public_subnet.*.id, count.index)
  route_table_id = aws_route_table.public.id
}
route table for the private subnet.
resource "aws_route_table_association" "private" {
count = length(var.private_subnets_cidr)
subnet_id = element(aws_subnet.private_subnet.*.id, count.index)
route_table_id = aws_route_table.private.id
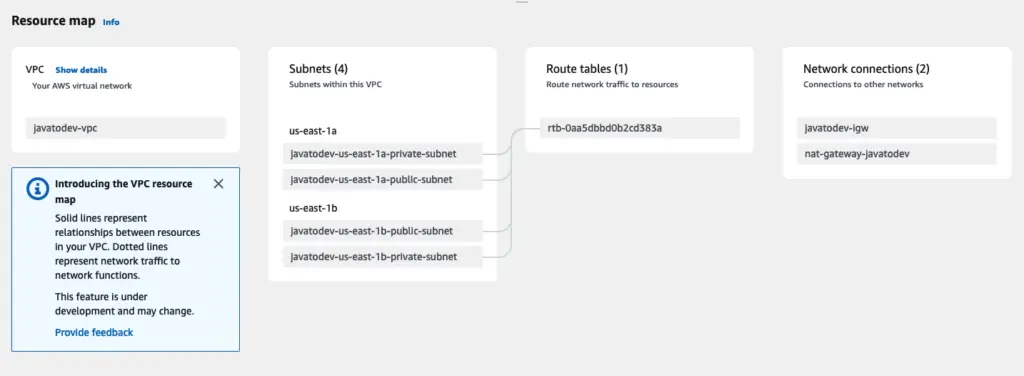
}Now we have a correct mapping from VPC, subnet, and route table with NAT gateway and internet gateway.
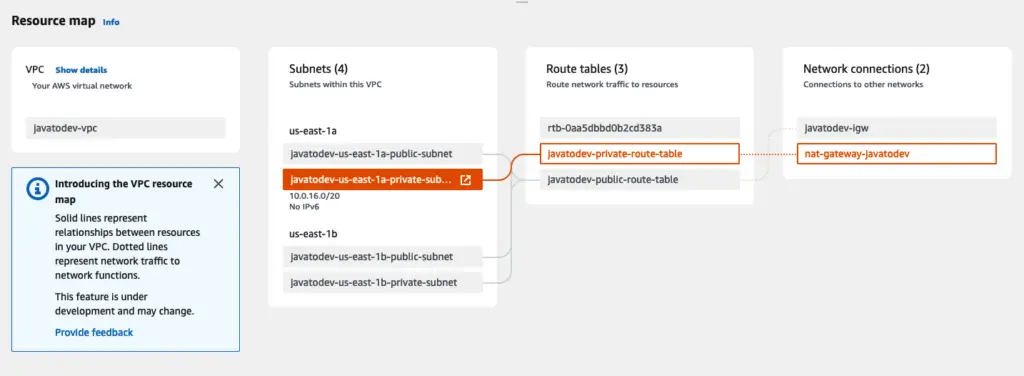
So finally terraform configuration should be like the below,
terraform {
  required_providers {
    aws = {
      source  = "hashicorp/aws"
      version = "~> 4.16"
    }
  }

  required_version = ">= 1.2.0"
}

provider "aws" {
  region = var.aws_region
}

locals {
  availability_zones = ["${var.aws_region}a", "${var.aws_region}b"]
}

# VPC
resource "aws_vpc" "vpc" {
  cidr_block           = var.vpc_cidr
  enable_dns_hostnames = true
  enable_dns_support   = true

  tags = {
    Name        = "${var.environment}-vpc"
    Environment = var.environment
  }
}

# Public subnet
resource "aws_subnet" "public_subnet" {
  vpc_id                  = aws_vpc.vpc.id
  count                   = length(var.public_subnets_cidr)
  cidr_block              = element(var.public_subnets_cidr, count.index)
  availability_zone       = element(local.availability_zones, count.index)
  map_public_ip_on_launch = true

  tags = {
    Name        = "${var.environment}-${element(local.availability_zones, count.index)}-public-subnet"
    Environment = "${var.environment}"
  }
}

# Private Subnet
resource "aws_subnet" "private_subnet" {
  vpc_id                  = aws_vpc.vpc.id
  count                   = length(var.private_subnets_cidr)
  cidr_block              = element(var.private_subnets_cidr, count.index)
  availability_zone       = element(local.availability_zones, count.index)
  map_public_ip_on_launch = false

  tags = {
    Name        = "${var.environment}-${element(local.availability_zones, count.index)}-private-subnet"
    Environment = "${var.environment}"
  }
}

#Internet gateway
resource "aws_internet_gateway" "ig" {
  vpc_id = aws_vpc.vpc.id
  tags = {
    "Name"        = "${var.environment}-igw"
    "Environment" = var.environment
  }
}

# Elastic-IP (eip) for NAT
resource "aws_eip" "nat_eip" {
  vpc        = true
  depends_on = [aws_internet_gateway.ig]
}

# NAT Gateway
resource "aws_nat_gateway" "nat" {
  allocation_id = aws_eip.nat_eip.id
  subnet_id     = element(aws_subnet.public_subnet.*.id, 0)
  tags = {
    Name        = "nat-gateway-${var.environment}"
    Environment = "${var.environment}"
  }
}

# Routing tables to route traffic for Private Subnet
resource "aws_route_table" "private" {
  vpc_id = aws_vpc.vpc.id
  tags = {
    Name        = "${var.environment}-private-route-table"
    Environment = "${var.environment}"
  }
}

# Routing tables to route traffic for Public Subnet
resource "aws_route_table" "public" {
  vpc_id = aws_vpc.vpc.id

  tags = {
    Name        = "${var.environment}-public-route-table"
    Environment = "${var.environment}"
  }
}

# Route for Internet Gateway
resource "aws_route" "public_internet_gateway" {
  route_table_id         = aws_route_table.public.id
  destination_cidr_block = "0.0.0.0/0"
  gateway_id             = aws_internet_gateway.ig.id
}

# Route for NAT Gateway
resource "aws_route" "private_internet_gateway" {
  route_table_id         = aws_route_table.private.id
  destination_cidr_block = "0.0.0.0/0"
  gateway_id             = aws_nat_gateway.nat.id
}

# Route table associations for both Public & Private Subnets
resource "aws_route_table_association" "public" {
  count          = length(var.public_subnets_cidr)
  subnet_id      = element(aws_subnet.public_subnet.*.id, count.index)
  route_table_id = aws_route_table.public.id
}

resource "aws_route_table_association" "private" {
  count          = length(var.private_subnets_cidr)
  subnet_id      = element(aws_subnet.private_subnet.*.id, count.index)
  route_table_id = aws_route_table.private.id
}
All done now we have the full VPC setup with all the necessary components to use whenever we need actual application deployments.
Please remember to remove the setup if you are no longer using it. since the NAT gateway and elastic IP are getting billed when in the ACTIVE stage.
$ terraform destroyConclusions
In this article, we have discussed How to Build AWS VPC Using Terraform – Step By Step Guide.
The implementation of all these examples and code snippets can be found in our Github repository.
Happy coding.
Recommended Reading
- How to Setup HashiCorp Vault With Spring Boot Application
- Task Scheduling on Spring Boot Using @Scheduler
- How to Use Amazon SQS With Spring Boot
- Multiple Datasources With Spring Boot Data JPA
- How To Handle Multiple Message Properties In Spring Boot
- Spring Boot JWT Authentication using Spring Security